Organization Management
Organization Management
The organization management module is used to display all created organizations within the system. In the organization management list, users can view detailed information about each organization, including the organization ID, name, administrator, number of members, associated applications, creation time, and status. Additionally, users can perform a fuzzy search by organization name.
Upon entering the organization management module, users with the appropriate role permissions can carry out various operations, such as creating, editing, enabling/disabling, inviting administrators, and assigning authorizations. The following is a detailed description of these operations:
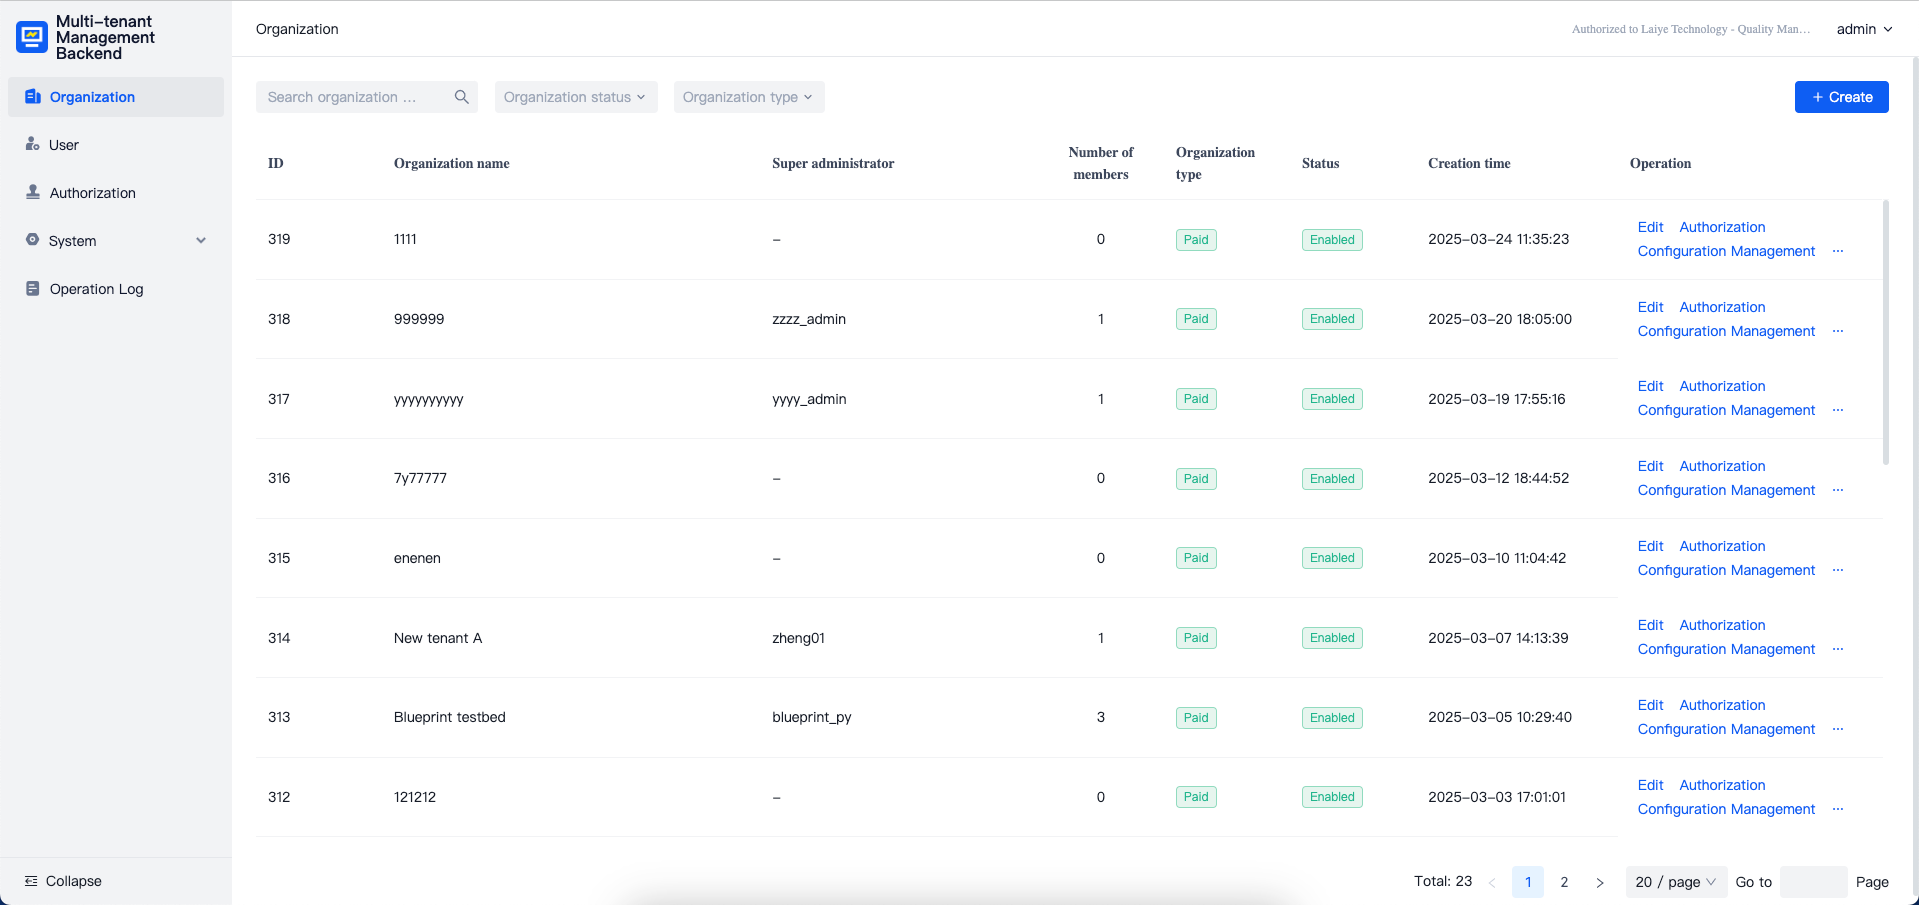
Interface Field Descriptions
- ID: A unique identifier automatically generated by the system for each organization, used to differentiate between different organizations.
- Organization Name: The name of the organization. Note that multiple organizations can have the same name.
- Super Administrator: The user designated as the super administrator for the organization. Each organization can only have one super administrator, who has the authority to dissolve the organization and change its name. Moreover, the super administrator also holds the system administrator role with all its associated permissions.
- Number of Members: The total number of members in the organization, including those in all statuses.
- Organization Type: Currently, there are two types: "Paid Version" and "Free Version". Organizations created in private deployments are of the "Paid Version", while those on public cloud platforms can be either "Free Version" or "Paid Version". The "Free Version" may have some restricted functions, whereas the "Paid Version" has access to all authorized services on the platform.
- Status: Indicates whether the organization is "Disabled" or "Enabled", affecting user login capabilities.
- Creation Time: The date and time when the organization was created.
- Actions: The operations that can be performed on the organization, including "Edit", "Authorization Management", "Invite Administrator", and "Disable/Enable".
Create Organization
To create a new organization, click the "Create" button, enter the desired organization name, and then click "Confirm". The newly created organization will be displayed in descending order of creation time in the organization list. The organization name must be between 4 and 30 characters in length.
Edit
To modify the name of an existing organization, click the "Edit" button next to the organization's entry.
Invite Administrator
Clicking the "Invite Administrator" button will prompt the system to perform the following actions based on the current state of the organization:
- If the organization already has an initial administrator, a popup will display the organization's name and the initial administrator's username.
- If there is no initial administrator, click "Generate Link and Copy" to create an invitation link for the initial administrator. This link will expire after 3 days and will need to be regenerated if it is not used within that timeframe.
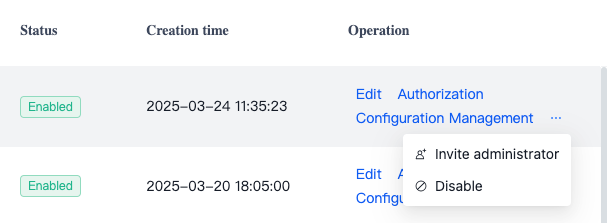
- If the user has already registered an account, clicking the invitation link will immediately make them the initial administrator of the organization, allowing them to log into the Commander system for configuration and management.
- If the user has not yet registered, they will need to complete the registration process using their username, email, or other provided methods.
Authorization Management
To allocate licenses to the current organization, click the "Authorization Management" button. The following types of licenses are available for allocation:
- Client-Automation Worker-Unattended-Floating License
- Client-Automation Worker-Attended-Floating License
- Client-Automation Creator-Floating License
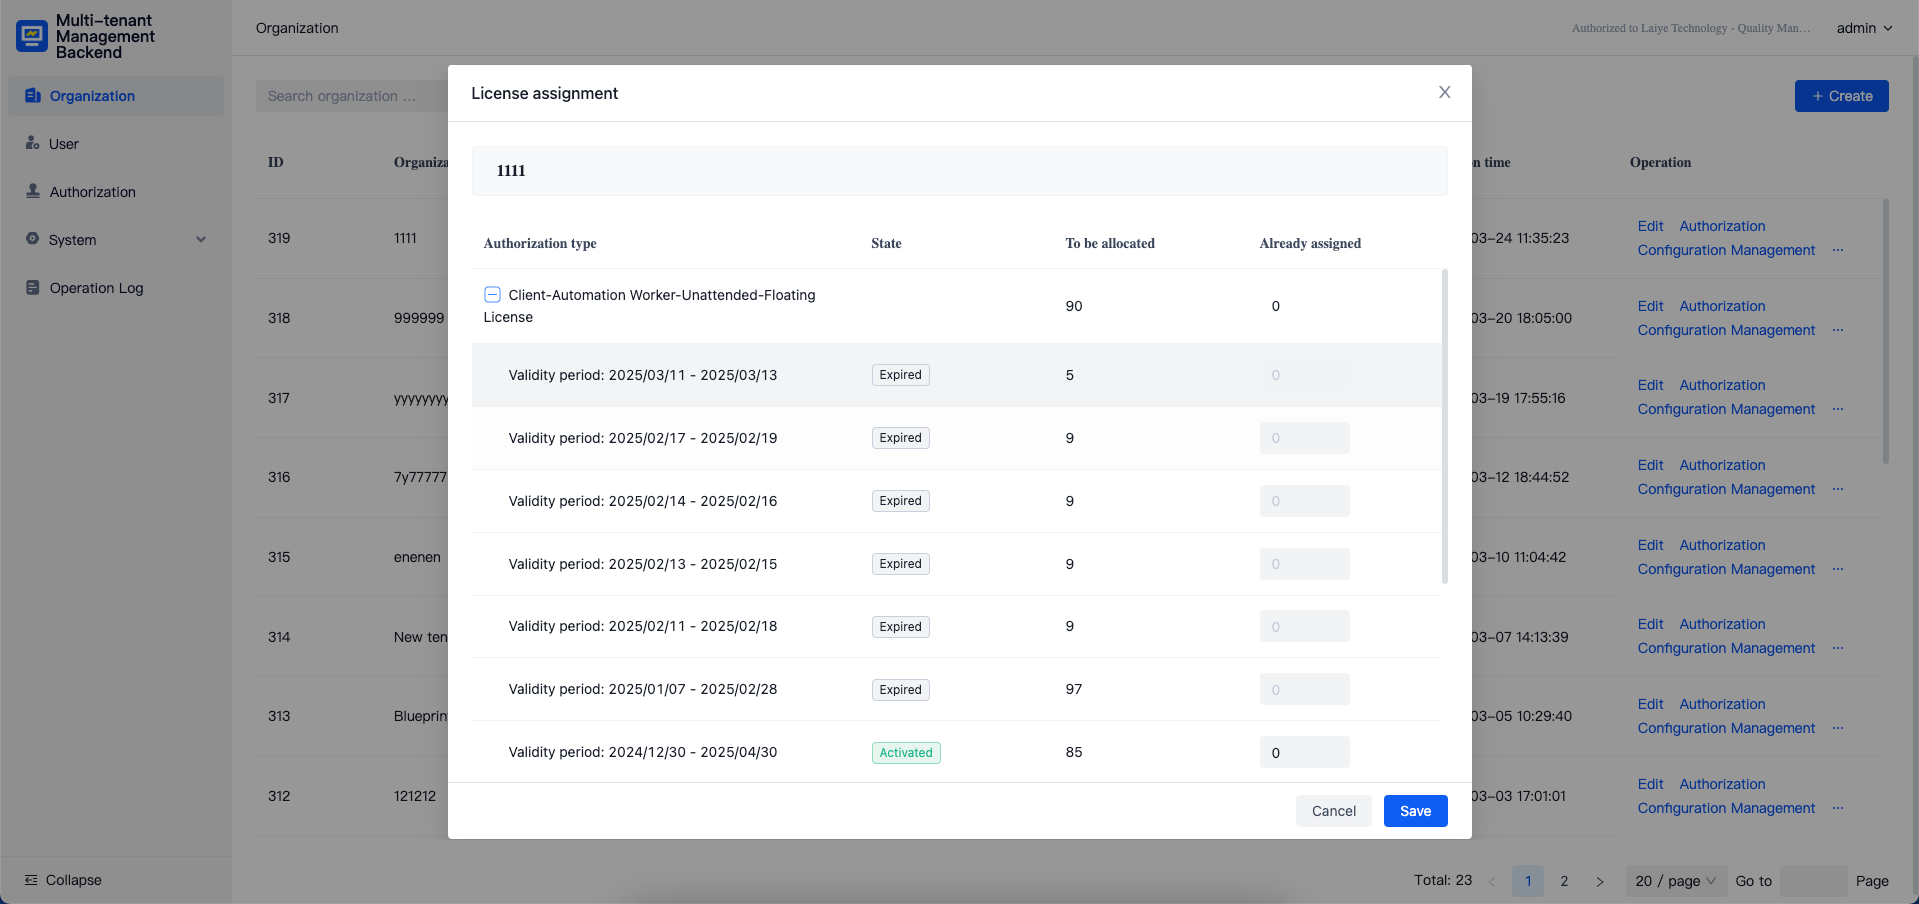
When allocating licenses, click the plus sign in front of the license type to adjust the "Allocated" quantity from the "Activated" licenses, then click "Save" to complete the allocation. Note that this operation directly modifies the total number of licenses for the organization, not an incremental allocation. The "Allocated" quantity shown represents the number of licenses already assigned to the organization. Adjusting this value can increase or decrease the number of licenses.
Configuration Management
Operation Instructions
In the organization's action options, click "Configuration Management" to access related configurations. Currently, this includes file space management for Automation Commander.
Users can manage the total file space used by the organization in Automation Commander.
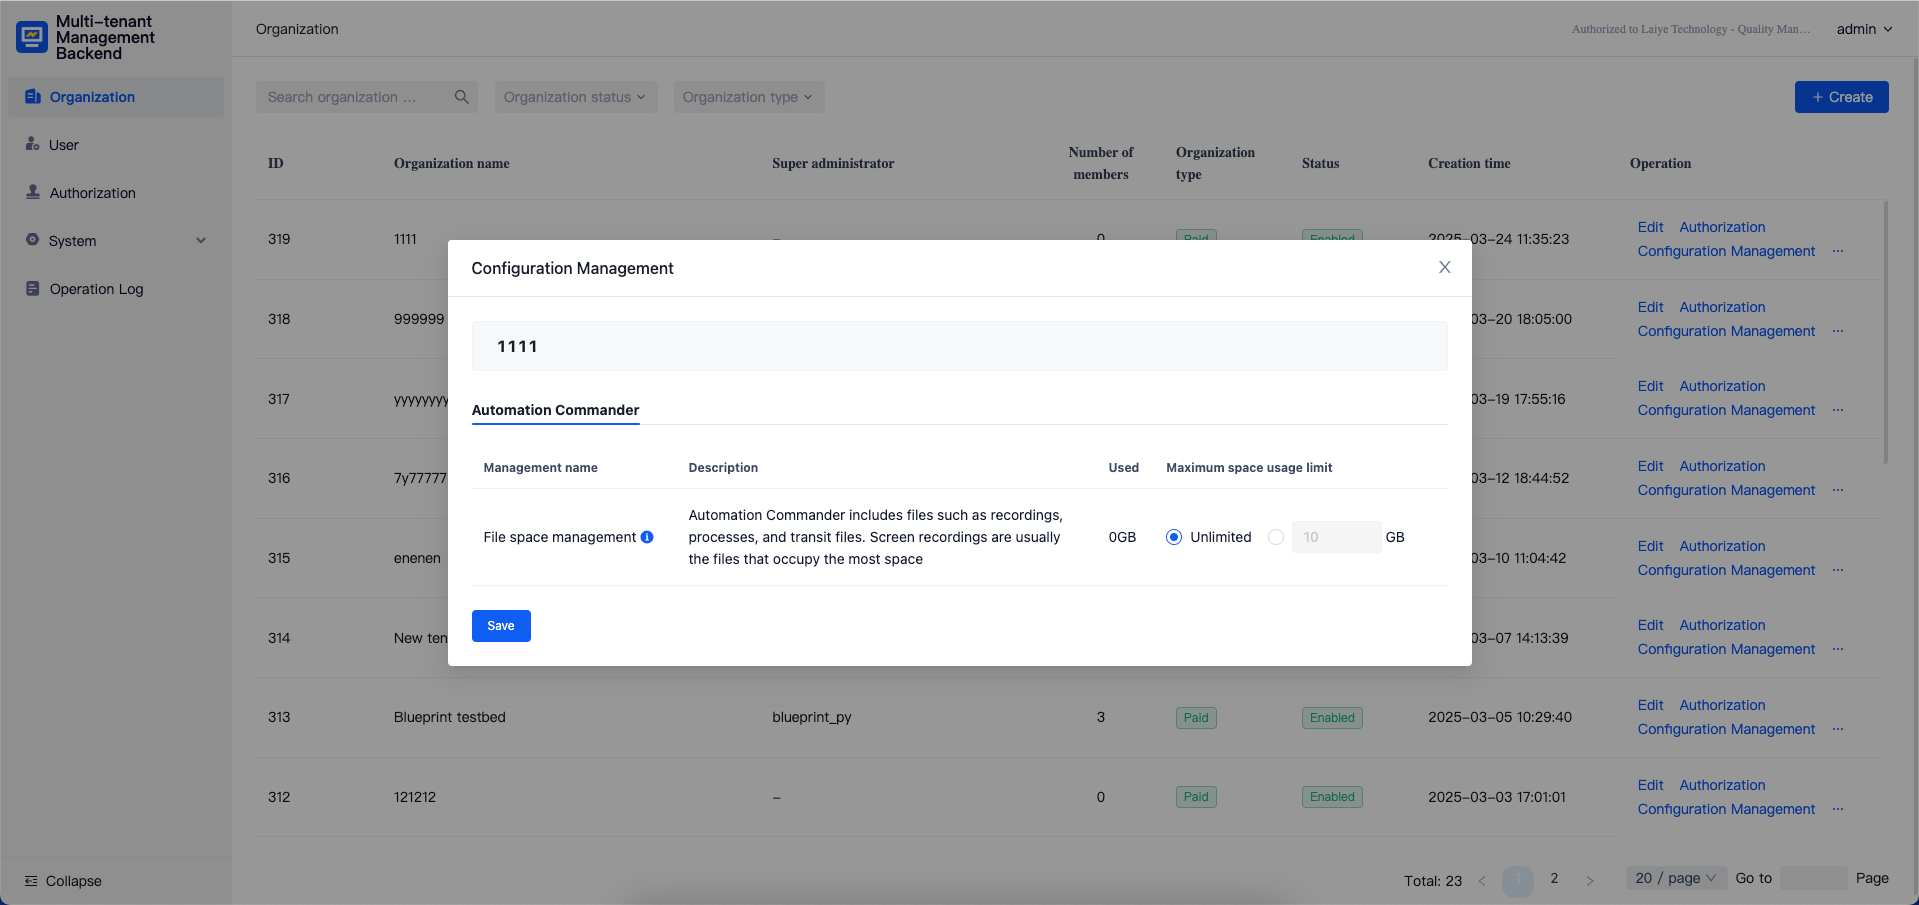
- Maximum Space Usage Limit: Sets the total size limit for file space. Users can choose a custom value or "Unlimited". If "Unlimited" is selected, the feature is disabled, and the organization can use an unlimited amount of file data. When a specific limit is set, the total file size generated by Automation Commander cannot exceed this value; if the limit is reached, some features will be disabled.
- Used Space: Displays the total file data currently used by the organization.
File Resource Descriptions
Below are explanations and cleanup suggestions for various data types:
| Data Type | Related Menu | File Resource Description and Cleanup Suggestions |
|---|---|---|
| Screen Recordings | Automation Commander - Tasks | Task screen recordings can occupy significant disk space. Adjusting the cleanup policy cycle or recording quality can reduce file size. |
| Task Screenshots | Automation Commander - Tasks | Using the "Upload Screenshot" command uploads screenshot files to Automation Commander. |
| Process Versions | Automation Commander - Processes | Each process version generates a process package file (.bot) and a description file (.html). |
| Files | Data Assets - Files | Uploaded files may occupy significant space and should be cleaned up regularly. |
| Credential Usage Record Screenshots | Data Assets - Credentials | Extensive use of credentials may lead to credential screenshots taking up considerable resources. |
| Automation Creator & Product Update Installation Packages | Management Console - Orchestration Management - Version Updates | Promptly delete installation packages that are no longer needed. |
| Automation Worker Engine Packages | Management Console - Orchestration Management - Process Engine | It is not recommended to delete engine packages unless confirmed unnecessary. |
Recommended Configuration Method
Limiting maximum space usage can prevent system failures due to excessive resource usage. It is recommended to enable this feature and set a reasonable space limit based on actual physical resources.
- For initial setup, it is advised to configure the limit to 80% of available disk space. For example, if the mounted space is 400GB, set the limit to 320GB.
- Regularly check the actual usage of file resources and adjust the limit value if necessary.
System Notifications
When the used file space reaches 70%, 90%, or 100% of the limit, the system will notify the organization's "System Administrator" role via internal messages and email.
Restrictions After Reaching the Limit
When the file space limit is reached, functionalities related to file uploads will be disabled, including the following:
| Disabled Feature | Notification |
|---|---|
| Version update packages cannot be uploaded | File storage space is full. Operation failed. Please contact the system administrator to clear space and retry. |
| Process engines cannot be uploaded | Same as above. |
| Screen recordings cannot be uploaded | Screen recording files will be stored on the client, which will attempt to re-upload them. |
| Process packages cannot be published | Same as above. |
| Task screenshots cannot be saved | Same as above. |
| Unattended monitoring timed screenshots | Default images or previously stored images will be used. |
| File upload failures | Same as above. |
| Credential usage screenshot upload failures | Same as above. |
Precautions for Upgrades
When upgrading from versions below 6.3.0 to version 6.5.x, file space usage data from the original version will not be automatically calculated. Perform the following operations to complete data calculation:
1. Enter the product deployment directory and use ./odctl docker -c config.yaml to access the container.
2. Inside the container, navigate to the /app directory.
3. Execute the command dotnet Laiye.EntCmd.Service.dll upgrade attachment-data to complete data calculation.
4. After calculation, the system will prompt "initData Completed."

Once completed, you can check whether the organization's used file space data has been updated in the [Multi-tenant Management Backend].
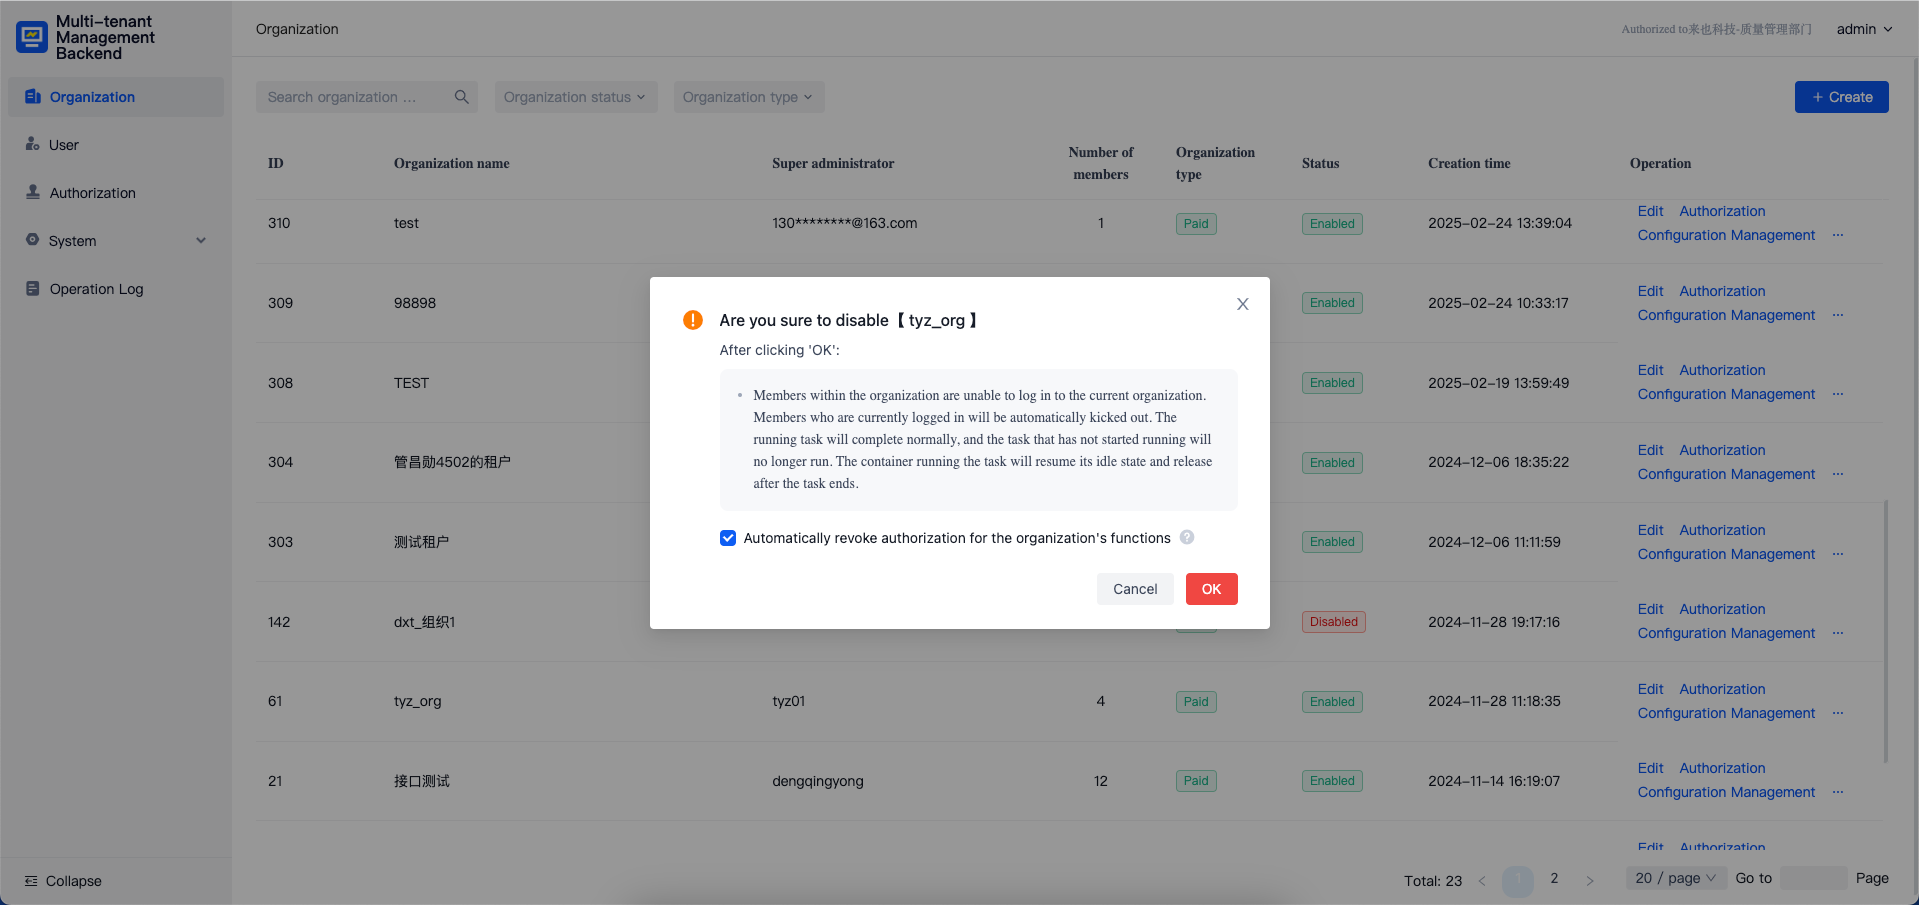
Disable and Enable
Organizations can have two statuses: "Disabled" and "Enabled." "Enabled" indicates that the organization is in normal use, while "Disabled" means the organization has been deactivated. When an organization is disabled, the following actions are taken:
- Logged-in members are automatically logged out.
- All pending tasks are canceled.
- Triggers are automatically deactivated.
- Running tasks will continue until completion.
- Members cannot log in to the organization, including Automation Commander, Attended Worker, Automation Creator, etc., but members with the "System Administrator" role can still log in to the [Management Console].
Before disabling an organization, the system will prompt for confirmation and require a second confirmation. Users can choose to "Automatically reclaim the organization's functional authorizations" and revoke authorizations assigned to the organization.