Group
Group is used to orchestrate and combine one or more existing processes, with the default list being empty. Automation Workers with "Attended-Node-locked License" and "Attended-Floating License" authorization modes support displaying the Group list and adding Groups.
Group List
After adding a Group, the Group list displays information (icons, process names, types) and operation buttons (quick run, run, edit, continuous run, runtime settings, process input settings, delete). It also supports fuzzy search by entering the Group name. The difference lies in the "type," which is "Group," and the support for editing and deleting.
Note: If the selected Group does not contain "process input," the "process input settings" menu will not be displayed.
Create
Due to the design of "Attended-Node-locked License" and "Attended-Floating License" authorization modes, the orchestration and combination differ when creating Groups after entering the "Group" feature area:
- "Attended-Node-locked License": Only supports orchestrating Local Processes.
- "Attended-Floating License": Supports mixed orchestration of Automation Commander processes and Local Processes.
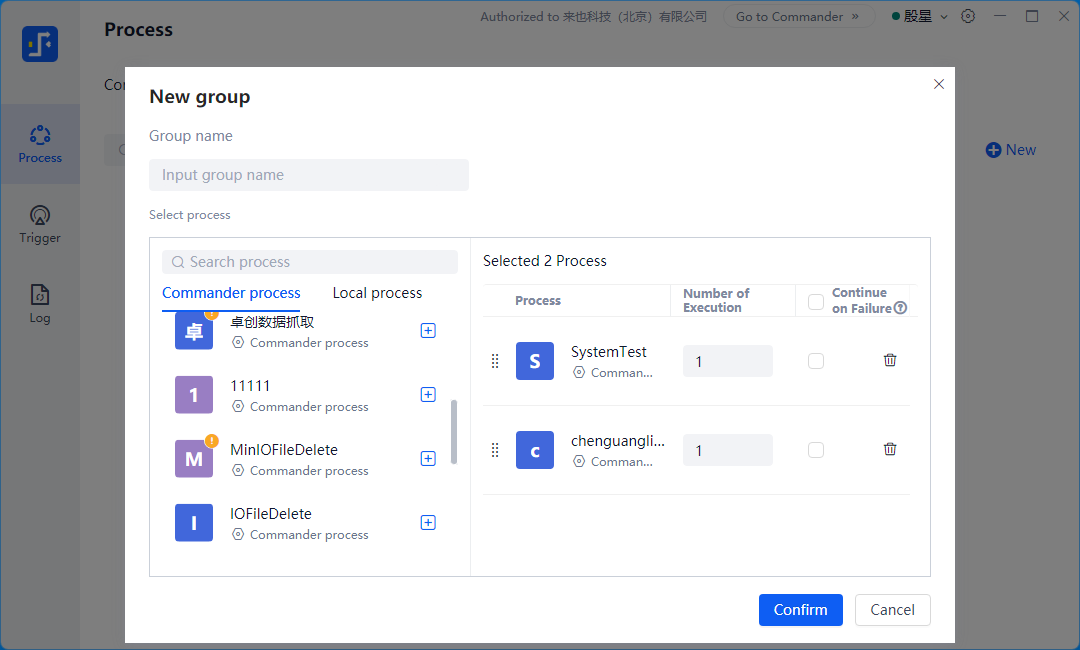
The steps to create a Group are as follows:
- Enter the Group name.
- Select processes. Click the "+" icon on the left to add processes to the Group as needed.
- Sorting: Hover the mouse over the "move" icon on the left of the process and drag up or down to sort the processes.
- Execution count: Set the execution count for each process as needed. The next process will execute only after the specified count is completed.
- Continue after failure: Check this option to continue running the next process based on the orchestration count and sequence if the current process fails.
- Delete: Click the "delete" icon to remove selected processes.
Delete
To delete a Group, click the "delete" button. The system will ask for confirmation.
When you click the "delete" button, the system performs a check. If the process is used by a Group or trigger, the process cannot be deleted. Similarly, if the Group is used by a trigger, the Group cannot be deleted.
Edit
You can edit the orchestration content of the selected Group, but the Group name cannot be edited.
Run Group
You can click the "Run" button to directly run the selected process.
During execution, Automation Worker minimizes by default. If you forcibly activate the window, the homepage will display "Running: xxxxxxx" at the top, and the "Run" button will switch to a "Stop" button. Clicking the "Stop" button will terminate the process, and the task result is usually "Failed."
When a process is running, you can forcibly terminate it by pressing Ctrl+F12 key.
Notes:
- If you run an older version of a process file with a newer version of Automation Worker, you may receive a system message as shown below. If the execution fails or does not meet expectations, you can configure the Automation Worker version to better adapt to historical versions of .bot files or update the process using the latest version of Automation Creator.
- If the process has a "Message Dialog" set during development, the corresponding message content and buttons will appear during execution, requiring you to click "OK" to proceed or end the process.
- For other issues, follow the page prompts for operation.
- If the process encounters problems, contact relevant technical personnel to debug and troubleshoot using Automation Creator.
Single Run
On the right side of the selected Group, click the "…" icon to open a menu panel with five options: Run, Edit, Continuous Run, Runtime Settings, Process Input Settings, and Delete.
Selecting "Run" executes a single run.
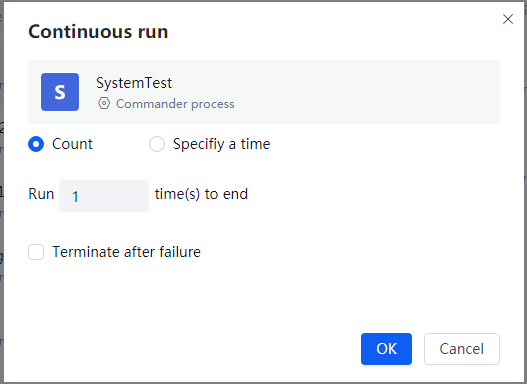
Selecting "Continuous Run" requires specifying the number of runs or the end time.
Choosing "Run" has the same effect as directly clicking the "Run" icon, which triggers a single run.
Continuous Run
When selecting "Continuous Run," a pop-up window appears with two options: (1) Specify the number of runs; (2) Specify the end time.
Continuous runs can also be configured to decide whether to terminate upon failure.
Examples are shown below:
Runtime Settings
Runtime settings include the configuration of "Clone Run" and "Run Hotkey." There are no operational differences under "Attended-Node-locked License" and "Attended-Floating License."
Clone Run
Each process and Group can individually enable Clone Run in the "Runtime Settings." Processes with Clone Run enabled execute in a clone of the current Windows desktop.
Prerequisites:
- CloneExtension plugin must be installed in the settings.
- Configure account and password in "Settings - Local Account."
Clone Run has the following characteristics:
- The Clone Run window and the user's original desktop window operate independently. Users can normally operate applications on the original desktop during Clone Run.
- During Clone Run, users can view the real-time execution screen of the process in the Clone Run window.
- Users can decide whether to control or pin the Clone Run window. Choosing control allows mouse operations within the Clone desktop.
When a process or Group enables Clone Run, clicking "Run" or "Continuous Run" opens a Clone Run desktop window. Before execution, login to the current Windows user account is required. Users can preconfigure a local Windows user account in settings for automatic login during Clone Run. If not configured, the local account settings pop up as shown below:
Enter the Windows user account password to execute the specified process in the Clone Run Windows desktop.
Hotkey Run
In the "Runtime Settings" of a process or Group, you can set the hotkey for process execution. After setting, the process or Group can be triggered to run by pressing the hotkey on the keyboard.
Process Input Settings
Process Input Settings mainly involve assigning personalized values to input variables before process execution to meet individualized business needs.
Process input variables include variable type, variable name, and variable value.
Variable types include text, number, boolean, and credential, designed by Automation Creator.
Select a process, click the " ..." icon, and choose "Process Input Settings" from the menu. An example is shown below:
Note: If the selected Group does not contain "process input," the "Process Input Settings" menu will not be displayed.
Group Details
Group details include the following:
- Number of processes in the Group. Click the "number" to view specific processes.
- Basic information such as Group name, creation time, last runtime, and process type.
- Configuration details such as run hotkeys and Clone Run settings.
An example of Group details is shown below:
View Logs
For processes, logs include the record and result of each execution.
For Groups, logs include the record and result of each sub-process execution.
Query Logs
Logs can be queried by execution results or date range.
Execution results include four types: Success, Failure, Stop, and Cancel.
Date ranges, as shown below, support quick selections like "Today, Yesterday, Past 7 days, Last month" or custom start and end dates.
View Execution Logs
Logs in process details can be viewed through a pop-up window.
View Screen Recording
Logs in process details also support viewing screen recordings via a pop-up window.