Advanced development features
Process commissioning
When we write a process with Laiye Automation Platform and run it, we always expect to get a successful result. However, sometimes the expected results are not achieved, especially for novices. Either Laiye Automation Platform reports an error or does not report an error when running, but the process does not get the expected results. At this time, you need to debug the process.
Debugging is the process of testing the compiled program manually or automatically to correct Syntax error and logic errors before it is put into actual operation. It is an essential step to ensure the correctness of computer software programs.
In fact, we have extensively used a program debugging method that is the most primitive, simple, but also the most commonly used and practical: the 'output debugging information' command. Add output debugging information to the previous or next line of key code to check whether the Parameter and return values are correct. Strictly speaking, this is not a method of program debugging, but it can be used to test and eliminate Software bug. It is also an important supplementary method when debugging is not supported.
This section will introduce In the true sense The program debugging method can accurately locate the cause and location of the error based on the error information prompted and the monitored runtime variables.
Principles of debugging
First of all, we should clearly recognize that: program is a means of implementing process in human brain into programming tools; Program debugging is essentially a way to help clarify the thoughts of the human brain. Therefore, during the debugging process, the human brain must be clear in order to quickly and accurately locate and solve problems.
Calmly analyze and reflect on the prompts related to errors.
Be open-minded and avoid getting stuck in blind alleys. A problem is that if a method has been validated and is not feasible, a different approach needs to be tried.
Avoid aimless exploration, as exploration should also purposefully reduce the scope of investigation and ultimately locate the wrong areas.
Debugger is only an auxiliary method and means to locate the error location and find the cause of the error. Debugger can help you clarify the data flow logic in the program, and can help you think, but can not replace thinking. When solving practical problems, you still need to make correct judgments after thinking according to the debugging prompts.
Don't just dwell on correcting an error, but rather consider the fundamental reason for this error, whether it was a careless name mistake? Or did you use the wrong command? Or is there a problem in process design? Only by identifying the fundamental cause of the error can we fundamentally avoid it and avoid making similar mistakes in the future.
Debugging methods
First of all, the business process of the system should be very clear. Business generates data, and data reflects business. The operation logic of process also represents the operation process of business and data. When an error occurs, you should first think about and know the business process and data that the problem depends on.
For example, when clicking the "Submit" button, an error occurs when submitting the form. At this point, one should consider: What data flow occurred after clicking the "Submit" button? Based on the error phenomenon and error prompt information, it is speculated where the error may occur during the flow of business data, in order to determine the breakpoint location for our debugging.
Debugging method of Laiye Automation Creator
Adding and removing breakpoints
In the Laiye Automation Creator, you can Settings breakpoints. During debugging, breakpoints will stop automatically. Considering that the main business logic of Laiye Automation Platform is in the process block, you only need to Settings breakpoints in the process block to meet the debugging requirements.
As we know, the process block contains two views: "visualization" and "source code". Either way, you can add and delete breakpoints in the following ways:
- Clicking on the blank space to the left of any command line can add breakpoints. Clicking on this location again can delete this breakpoint.
- Select a command line and select "Run" ->"Settings/Cancel Breakpoint" in the menu. If there is no breakpoint before, a breakpoint will be added; If there were previously breakpoints, they will be deleted.
- Select a command line and press the hotkey F4 directly, the effect is the same as before.
After Settings the breakpoint, a red circle will appear in the left margin of the command line, and the background of the command line itself will turn red. As shown in the following figure:

Debug Run
In the process of writing the process block, we can find that there are four menu items under the "Run" column of the menu bar: run, run the whole process, debug run, debug run the whole process. Click the dropdown button on the right side of the "Run" icon on the toolbar, and there are four similar options available. Their meanings are:
- Run: only the current process block is run, and all breakpoints are ignored.
- Run the whole process: run the whole process diagram and ignore all breakpoints.
- Debug Run: only runs the current process block, and stops when a breakpoint is encountered.
- Debugging and running the whole process: run the whole process diagram, and stop at breakpoints.


Single step debugging
When debugging and running, the program will automatically stop at the breakpoint. At this point, four common debugging actions are listed in the debugging status bar: continue running (F6), step over (F7), step in (F8), and step out (F9). Continuing to run "refers to continuing to the next breakpoint; 'Step by' refers to continuing to run the next command; 'Step in' refers to continuing to run the next command. If the next command is a function, enter the function and stop at the first command within the function; Step out "refers to jumping out of the function at this level and returning to the previous level.
The value of the process block variable is listed at the bottom left of the debugging status bar. When the program runs to the breakpoint and pauses, the next step of debugging is needed Pay attention to observation Whether the data of each step of the program operation is the correct data processed by the business process to determine whether the program is correctly executed. These data include input data, return data, etc. If the program does not enter our preset breakpoint after running, it is necessary to re guess the location of the error and re Settings the breakpoint according to the error information and business processing process logic. Ultimately, a major problem is continuously refined and broken down, ultimately pinpointing the error point.

The lower right corner of the debugging status bar lists the breakpoints for this process block, which can be enabled, disabled, and deleted as needed.

Tips for Settings Breakpoints
Generally, the way and location of Settings breakpoints are as follows:
Break point in the first logical program line of the method where an error may occur.
The line in the method that is most likely to cause an error is marked with a program breakpoint.
Unit Test Block
Generally speaking, a process diagram consists of one or more process blocks. If the process is complex, the process usually contains more process blocks, or a single process block has more commands. When we debug the process block executed later in the process diagram, if the later process block depends on the data input of the previous process block, the debugging of the later process block will be very time-consuming and laborious. Let's take a specific instance: suppose a process consists of two process blocks, called "front process block" and "back process block". Two Global variable are defined in the process x and y , In the "Front process Block" x and y Assign as 4 and 5 , "Later process Blocks" are printed out separately x , y and x+y The value of.

We clicked Run in the flowchart view and saw that the correct results were output:

If we want to test whether the function of the "backward process block" (actually an addition module) is correct, then the "backward process block" cannot be executed independently. If we click Run in the visual view or source code view of the "backward process block", an error will be reported:

In order to test this "backward process block", the "forward process block" must be executed because x and y The assignment operation comes from the "Front process Block". Here, the "front process block" is relatively simple, and only a few assignment operations have been done. If the "front process block" is relatively complex, such as x and y The values of are derived from the statistical quantity of certain types of products captured on Tmall and JD websites. The cost of testing this "backward process block" will be very high.
So what should we do? In "Laiye Automation Creator", a unit test block is provided to test a single process block. Returning to the previous example, let's take a look at the specific usage of unit test blocks.
Open the source code view of "Back process Block", and insert a "Unit Test Block" command under the "Basic Command" directory of "Basic Command" in the command center. We can see that in the source code view, UnitTest and End UnitTest The middle is the unit test block, and we fill in the test commands in the middle as follows x and y assignment 3 and 2 .

We click Run again in the visual view or source code view of the "Back process Block", and the execution is correct:

The unit test block has the following characteristics:
Firstly, no matter where the unit test block is placed in the process block, it will be prioritized for execution.
Second, only when a single process block is run, the unit test block in this process block will be executed; If the whole process is running, the unit test block in the process block will not be executed.
The first feature ensures that when debugging a single process block, the unit test block will definitely be executed; The second feature ensures that the code of the unit test block will not affect the operation of the entire process. Whether running a single process block or the entire process, the correct results can be obtained.
Timeline
Version control of source code is a very important engineering tool in software development, which can save the historical version of the code and trace the progress of the code to any time node. Version control is a necessary means to ensure the normal progress of a project. For beginners, it is recommended to perform source code version control at the beginning of practical small projects, which will be of great benefit in future work.
Among the Laiye Automation Creator, the integration of the famous code version control software Git provides a powerful version control means: Timeline . The so-called timeline refers to the code versions at different time points.
- Manually Save Timeline
The user moves the mouse to the "Timeline" button on the toolbar, and the "Save Timeline" button appears on the "Timeline" button. Click "Save Timeline" to save the process at this time point. When saving the timeline, it is necessary to fill in note information to describe what content of the code has been modified at that time point.

- Automatically save timeline
If the user does not remember to save the timeline, it does not matter. Every five minutes, the Laiye Automation Creator will automatically save the timeline; If the user has not modified the process content during this period, the timeline will not be saved.
- View Timeline
Click the "Timeline" button on the toolbar, and the "Timeline" page will list saved time points by "Today", "Within Seven Days", and "Before". Click any time point to view the content difference between the current file and the selected time point file. The content difference will be marked with a red background.
If you want to restore a portion of the code for this timeline, you can directly click on the blue arrow in the code comparison box to restore the code to the existing code.
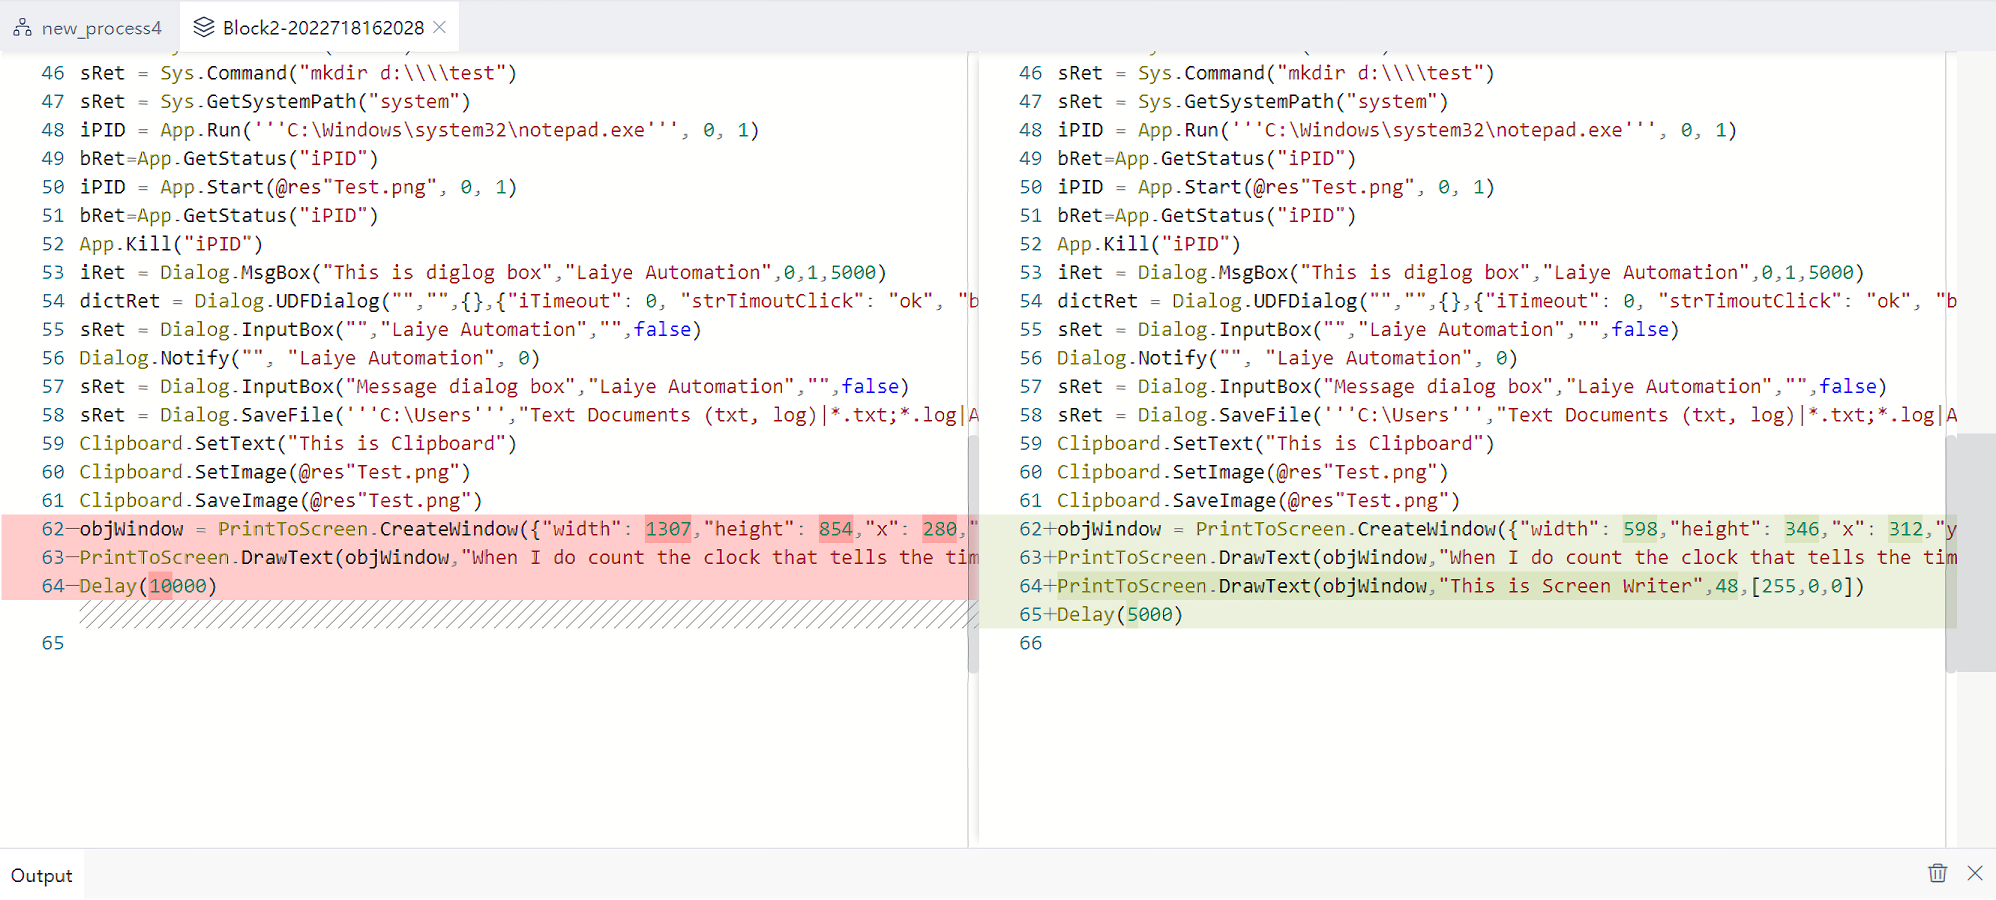
- On the "Timeline" page, click on the note details at any time point to view the detailed information of the note at that time point, as shown in the figure:

- On the "Timeline" page, click the recovery button at any point in time to restore the code content of that timeline to the existing code. After the recovery, there will be a green R mark in the upper left corner, indicating Revert. Moving the mouse over the R mark will display the specific time point from which to restore.
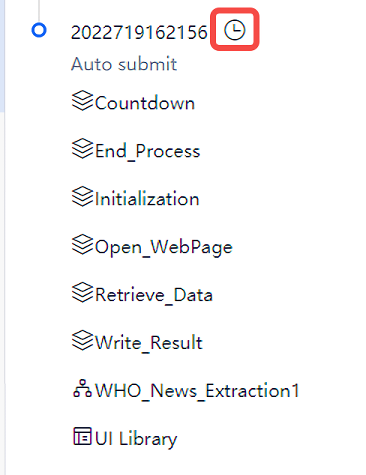
Library
Modular thinking
The idea of modularization has existed in many industries for a long time, and it is not the original creation of computer science.
For example, the construction industry has long put forward the concept of Modular building, that is, prefabricate various housing module components in the factory, and then transport them to the project site to assemble various houses. Modular components are prefabricated in the factory, which facilitates production organization, improves efficiency, saves materials, and is less affected by the environment. When assembling modules, construction is simple and fast, flexible and diverse, clean and environmentally friendly, and building a house is like building a building block toy for children.
For example, modern electronic products are becoming increasingly complex in function and larger in scale. By utilizing the idea of functional decomposition and combination in modular design, modular components (such as integrated circuit modules) can be selected, and their standardized interfaces can be used to build electronic systems with complex functions. Modular design not only accelerates the development cycle, but also greatly improves the reliability of electronic systems through tested modular components. Standardized and universal components make the system easy to build and maintain.
In short, the idea of modularization is to decompose the product into several functional modules based on functional analysis, and then assemble the prefabricated modules to form the final product.
Pre-built components among Laiye Automation Creator are a typical example of modularization. Among Laiye Automation Creator, hundreds of pre-built components have been provided, covering mouse and keyboard, operation of various UI elements, automatic operation of common software, data processing, file processing, network and system operation. These pre-built components are modularized, independent and can be combined to complete complex functions.
In addition to pre-built components, you can also assemble some functions realized by the Laiye Automation Creator into modules. If you want to reuse similar functions in the future, you don't need to rewrite them, just use this module. For example, in a project, we used the Laiye Automation Creator to perform the function of "bank account journal download", which can be assembled into modules. In future projects, as long as the module is imported, the "Bank Account Journal Download" function can be directly used, saving time and effort.
In Laiye Automation Creator, such modules are called Library. A Library contains several commands that can be dragged in a visual view or displayed in a form close to natural language, just like prefabricated parts, for easy understanding.
Create Library
Here we use a practical example to illustrate how to build a Library: suppose we have designed a module that contains four functions: addition, subtraction, multiplication, and division. We want to package these four functions as four commands in a Library for future use. Of course, in the process of actual use, commands such as Elementary arithmetic are too simple and meaningless. However, if readers grasp the usage of the Library through this example, they will naturally realize more practical and complex functions.
In the Laiye Automation Creator, when we click the "New" button on the home page, a dialog box will pop up. You can choose whether to create a process or a Library (as shown in the following figure).
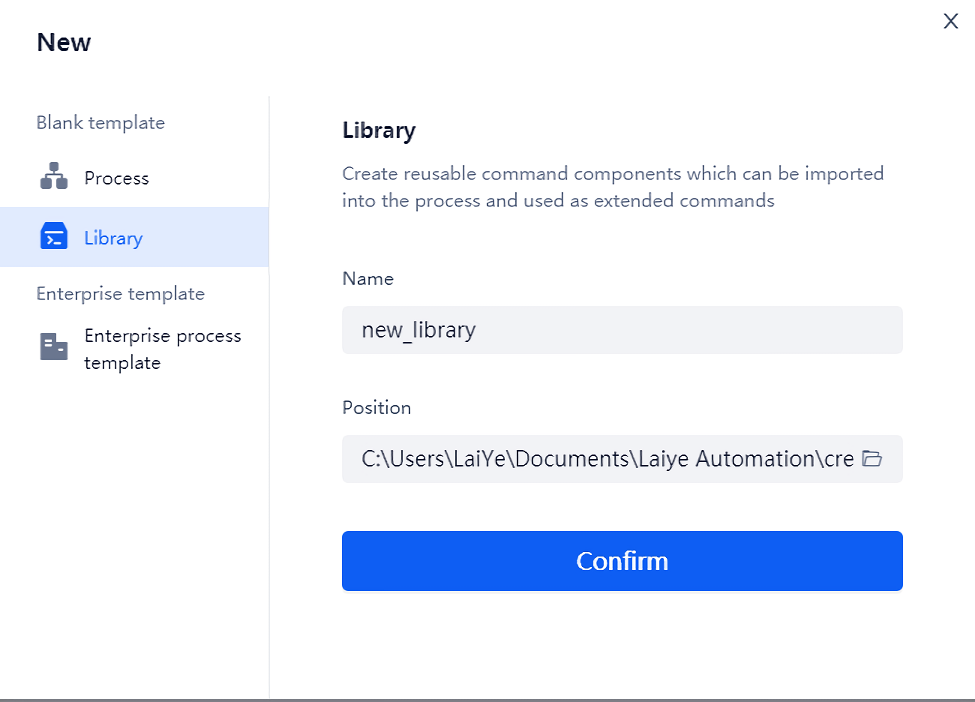
After selecting the Library, you can see that the writing UI of the Library is similar to the writing flow block. In fact, the Library can indeed be regarded as a special process block, but it will not be executed from the first line like the ordinary process block, but needs to Settings several" subroutine ". If you are familiar with other programming languages, the term "subroutine" is actually equivalent to "function" or "procedure" in other languages. The reason why it is called a "subroutine" is to help developers with limited IT foundation who are not familiar with other programming languages avoid confusion (such as confusion with the concept of "function" in mathematics).
Each subprogram in the Library is a "command" to the User of the Library. So, just like the existing prefabricated commands, we can Settings a name and a group of attribute for them, and these names and attribute will also be seen by User.
After creating a new Library, as an example, the Laiye Automation Creator has helped us generate a subroutine framework. In the visual view and source code view, its contents are shown in the following figure. In the source code view, a comment will also be generated to aid understanding.


We have learned to use source code to write process content, switch to source code view directly, and paste the following source code into it.
Function Plus(augend, addend)
    Return augend + addend
End Function

Function Subtract(minuend, subtrahend)
    Return minuend - subtrahend
End Function

Function Multiply(multiplicand, multiplier)
    Return multiplicand * multiplier
End Function

Function Divide(dividend, divisor)
    Return dividend / divisor
End Function
Switch to the visual view, and you can see that we have completed a Elementary arithmetic Library, which contains four commands. As shown in the following figure. Of course, you can also directly write the Library and commands in the visual view. The specific process is relatively simple and will not be repeated.
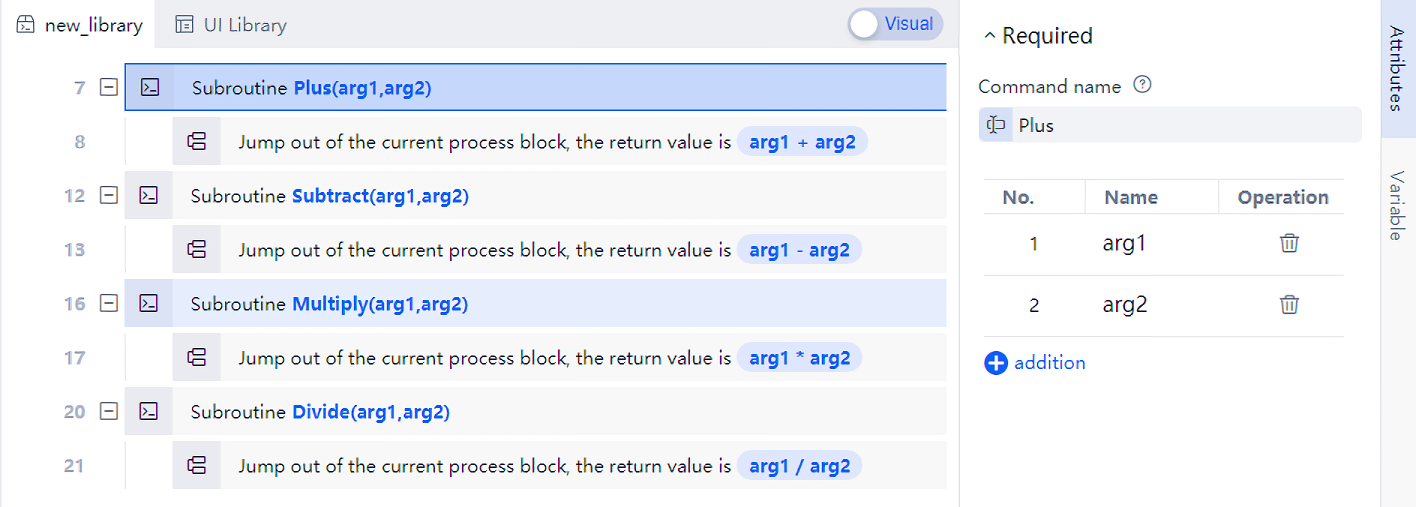
The Library has been established so far, but for the convenience of others, it is recommended to use the "Publish" function to publish the Library as an independent file for others.
When writing the Library, we can see that there is a "Publish Library" button on the toolbar, as shown in the following figure.

Click this button, and the process creator will verify whether there are errors in the Library. If there are no errors, a dialog box as shown in the figure will pop up. The default values in this dialog box have been filled in and can be left blank. And even if it is not filled in, it will not have any impact on the use of the Library. But in this example, We still modified the content of the red box to make it easier for users to use the Library.
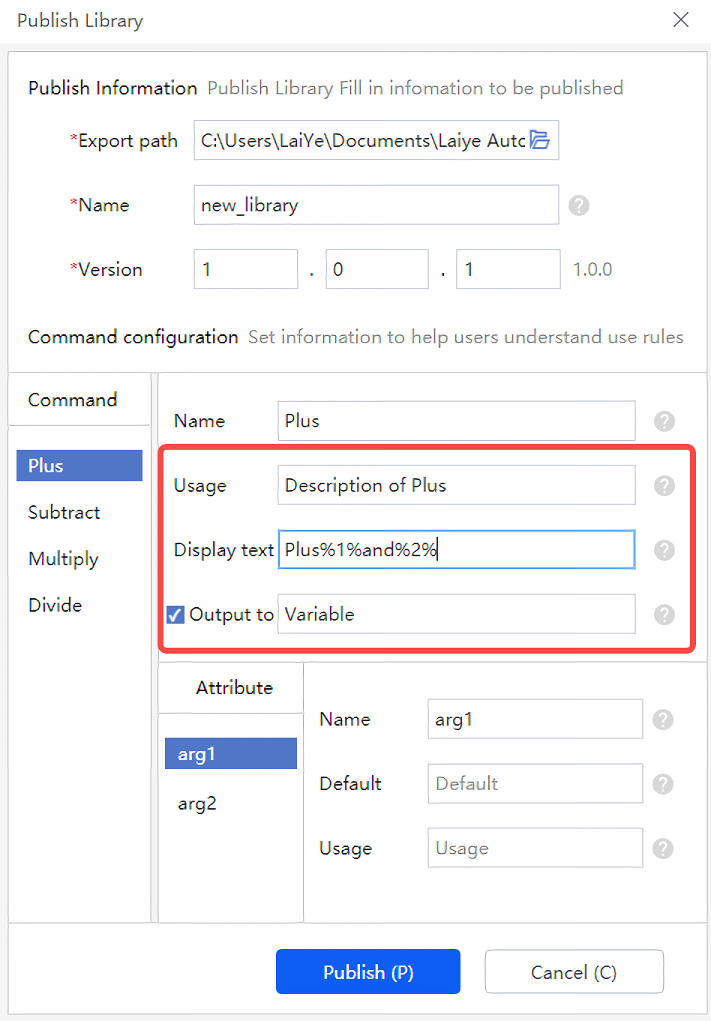
The significance of these modifications is:
- Fill in the "Instruction" column, so that when others use the Library and move the mouse over the command, there will be a floating window explaining the specific statement of the command;
- Fill in the "Visual Translation" column, so that when others use the Library, this command can appear in a more understandable form in the visual view. Among them
%1%and%2%, The first attribute and the second attribute of the command will be substituted in the visual view. For example, the first attribute is1, The second attribute is2, The content displayed in the visualization view is"Plus 1 and 2", Instead of the default"Arithmetic.Plus(1,2)". Obviously, the readability of the former is much better; - Check the "Output to" column and fill in a variable name, such as "Add result". When other people use the Library, every time they insert this command, they will also put the execution result of the command into this variable.
After filling in, just click the "Publish" button to publish the Library as an independent .zip A file with an extension. Send this file to other colleagues in various ways (such as email, USB flash drive, etc.). They can use the commands in the Library just as they use other pre-built components in the Laiye Automation Creator.
Let's see how to import the Library.
Importing and Using the Library
If one of our colleagues gets the Library we issued, the specific use method is:
Open any process with the Laiye Automation Creator, and then open any process block;
Find the button for "Command Center" in the left panel, click this button, select "Custom Library Command" under "Custom Command", as shown in the red box in the following figure.
Find the "Import Library" button, click it, and select the released Library file (Extension:
.zip). After importing, the imported Library will appear on the UI, as shown in the green box in the following figure.

- Back in the UI of writing the process block, you can see that a "Extension command" has been added to the command list on the left, which includes the "Elementary arithmetic" we imported, and there are four commands in it, corresponding to the four "subprograms" defined when writing the Library.
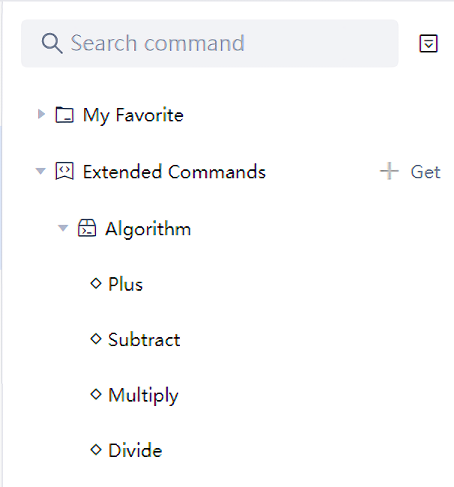
The usage of these commands is the same as other prefabricated commands in the Laiye Automation Creator.
It is worth noting that:
If we import a Library when writing a process block, the Library is available in all process blocks in the current process. However, if another process is changed, it needs to be re imported;
When process using the Library are packaged for use by the "Laiye Automation Worker", the Library will be automatically packaged without additional processing.