Network and system operation
So far, most commonly used commands in Laiye Automation Platform have been described. In fact, although the "network" and "system operation" commands in Laiye Automation Platform are used less frequently, they can also play a great role if applied properly. We introduce these two types of commands in this chapter.
Network operation
HTTP Operation
In the network age, we often hear HTTP This word, because almost all URLs need a prefix http:// Or https:// . In fact, HTTP Abbreviation of Hyper Text Transfer Protocol, which refers to the hypertext transmission and communication protocol between the local browser and the network server. That is to say, when we use a browser to visit a website, we essentially deal with a remote network server through the HTTP protocol.
In fact, other Applications can also communicate with the network server as long as they follow the standard of HTTP protocol. That's great! This shows that some web page automation operations described in the previous chapter can be directly operated through the HTTP protocol instead of the browser. This has opened up a new way for network operation automation.
HTTP requests that are widely used mainly fall into two categories: HTTP GET and HTTP POST . Let's see how to implement these two types of requests in Laiye Automation Platform. First, HTTP GET requests. Under the "HTTP" command Category of "Network" in the command center, select and insert a "Get Data" command, which will create an HTTP GET request pointing to a specific web address. The command has four attribute, as shown in the following figure.

" URL " The attribute indicates the URL of the HTTP request; The "Form Data" attribute is a JSON format string representing the data to be sent in this HTTP request. There are two sets of key value pairs, namely "user" and "username", "password" and "12345678", as shown below.
{
    "user": "username",
    "password": "12345678"
}
The "Timeout" attribute specifies the timeout of the HTTP request. If no data is returned after this time, the HTTP request is considered to have failed. The "Output to" attribute fills in a variable name, which will save the results returned by this HTTP request in the form of a string. The format of the returned results will vary greatly with different URLs. Generally speaking, if it is a website that can be browsed by people (e.g https://www.laiye.com ), Then the returned string is usually in HTML format; If it is an online service, it usually returns a string in XML or JSON format. In this example, the URL we tested http://httpbin.org/get It is an online service, and its return result is also a string in JSON format, as shown below. If you need to further process the returned result, you can What I learned earlier , Parse the JSON string.
{
    "args": {
        "password": "12345678",
        "user": "username"
    },
    "headers": {
        "Accept": "*/*",
        "Accept-Encoding": "gzip, deflate",
        "Host": "httpbin.org",
        "User-Agent": "python-requests/2.21.0"
    },
    "origin": "49.94.16.174, 49.94.16.174",
    "url": "https://httpbin.org/get?user=username&password=12345678"
}
HTTP GET requests can not only execute ordinary GET requests, but also download files. This function is implemented through the "Get Download Files" command. This command has five attribute, of which" URL ", The meaning of the four attribute "Form Data", "Timeout", and "Output To" is the same as the four attribute of the previous "Get Data" command. The other "File Path" attribute fills in the save path of the downloaded file.

Let's see how to implement HTTP POST requests in Laiye Automation Platform. In the HTTP directory of the command center Network, select and insert a Post Submission Form command, which will create an HTTP POST request pointing to a specific Web address. The command has four attribute, as shown in the following figure.

" URL ", "Form Data", "Timeout" and "Output to" attribute have the same meaning as the "Get Data" command's attribute. It should be noted that the "form data" sent by the HTTP POST request is related to the URL of the request and needs to be carefully checked with the relevant business personnel. The key value pairs of "form data" should be carefully filled in correctly. Similarly, the result returned by HTTP POST request is also a string, but the specific format will vary with different URLs. It may be JSON string, HTML string, or other strings.
E-mail Protocol
In the enterprise business process automation, the automatic sending and receiving of e-mail is a very important part, and it is very basic and high-frequency. In addition to automatically operating the mail client or logging in to the mailbox through the browser, Laiye Automation Platform also provides commands to send and receive mail directly based on the e-mail protocol. Common e-mail protocols include SMTP, POP3, IMAP, etc. They all belong to the TCP/IP protocol cluster. By default, they connect through TCP ports 25, 110, and 143 respectively. Before using commands (SMTP, POP, IMAP), you usually need to log in to the mailbox to make some Settings. The following is an example of QQ mailbox.
Open the browser, log in to QQ mailbox, click the "Settings" button, and then click the "Account" property to find the "POP3/IMAP/SMTP/Exchange/CardDAV/CalDAV service", Start "POP3/SMTP Service" and "IMAP/SMTP Service" (the service is turned off by default). At this time, the QQ mailbox system will generate a series of authorization codes and save them (only displayed once). Subsequent mail collection and sending operations will use this series of authorization codes instead of the original password of your mailbox.

Then click "How to use Foxmail and other software to send and receive emails?". The help document contains key settings of QQ mailbox, as shown in the following figure: POP server address is pop.qq.com, port number is 995, SSL is "Yes"; The SMTP server address is smtp.qq.com, the port number is 465, and the SSL is Yes. These information will be used in subsequent Laiye Automation Platform mail commands.

Then click "What is IMAP and how is it Settings?" This help document also contains the key Settings information of QQ mailbox, as shown in the following figure: receiving mail server: imap.qq.com, using SSL, port number 993. This information will also be used in subsequent Laiye Automation Platform email commands.

SMTP
The full name of SMTP is "Simple Mail Transfer Protocol", that is, the Simple Mail Transfer Protocol. It is a set of specifications used to transfer mail from the source address to the destination address, through which the transit mode of mail is controlled. Under the "SMTP/POP" command Category in the command area "Network", select and insert a "Send Mail" command, which will send an email to the specified mailbox using the SMTP protocol.

The command has several attribute: "SMTP Server" attribute is used to fill in the SMTP server address of the mailbox, "Server Port" attribute is used to fill in the SMTP protocol port number, and "SSL Encryption" attribute is selected as "Yes". These three information have been obtained in the QQ mailbox settings in the previous step, where the server address is smtp.qq.com, and the port number is 465; For the "mailbox account" attribute, fill in the mailbox account to be logged in (the mailbox account is consistent with the sending mailbox information); Fill in the generated authorization code for the "Login Password" attribute (the authorization code is generated in the Settings of QQ mailbox, and different mailboxes may have different Settings); For the "Receiving Email" attribute, fill in the email account of the other party; The "Mail title" attribute fills in the title of the mail to be sent; The "Message Body" attribute fills in the body of the message to be sent (text format only); The "Mail Attachment" attribute fills in the attachment file address of the mail to be sent; Finally, the "Output to" column will put the success of this email sending operation into the specified variable. If it succeeds, it will be set to True, and if it fails, it will be set to False.
The SMTP protocol is simple to use. One command is enough, but it can only send emails. If you want to receive mail, you need to use the POP protocol.
POP
POP means the Post Office Protocol, which is responsible for retrieving e-mail from the mail server. POP3 (Post Office Protocol 3), the third version of the Post Office Protocol, is the first offline Protocol standard for Internet e-mail. POP protocol has been widely used on the Internet today.
You can use the POP protocol to receive emails, but it is a little more complicated. One command is not enough. It requires the cooperation of multiple commands.
Under the "SMTP/POP" command Category in the command area "Network", select and insert a "Connect Mailbox" command. This command will use the POP protocol to connect to the specified mailbox and support subsequent mail collection operations.

The command has the following attribute: the attribute of "server address" fills in the POP server address of the mailbox, the attribute of "server port" fills in the POP protocol port number, and the attribute of "SSL encryption" selects "Yes". These three information have been obtained in the previous step of QQ mailbox setting, where the server address is pop.qq.com, and the port number is 995; For the "Email account" attribute, fill in the email account to receive emails; For the "Login Password" attribute, fill in the authorization code of the email (consistent with SMTP); "POP3" is filled in by default for the "Use Protocol" attribute; For the "Output to" attribute, fill in the variable name objMail. This variable will save the mailbox object obtained after connecting to the mailbox. This mailbox object will be used for subsequent commands such as obtaining the mailing list, deleting messages, and downloading attachments.
After successfully connecting to the mailbox, you can now collect mail.
In the command area "Network", under the "SMTP/POP" Category, select and insert a "Get Mail List" command, which will output a specified number of mail information lists (the result is a dictionary type variable, which can get the length, traverse the content, etc. In addition, the mailbox server generally limits the collection of mail only in the last 30 days, and you can change this limit yourself). This command has several attribute: the attribute of "operation object" fills in the mailbox object objMail just obtained in the "Connect Mailbox" command; "Number of mails" indicates how many mails we need to collect. Here is 10 , It means to receive 10 emails. If you do not want to limit the quantity, you can fill in 0 ; The "Output to" attribute fills in a variable name, which will save the execution result of the "Get Mail List" command: 10 mail messages.

There are two commands - "Download Attachment" and "Delete Email", which not only need to combine the mailbox object returned by the "Connect Mailbox" command, In addition, it can only be used in combination with the return results of "Get Mail List" (that is, get an element from the mail list, which is called the mail object. The mail object is actually a dictionary, including the header, body, attachment, sender, date, size and other field information of an email).

In addition, specify the mail object to delete the corresponding mail. After using this command to delete the mail, you must call the "Disconnect Mailbox Connection" command to actually delete the mail. If the mail server sets "Prohibit receiving software from deleting mail", it still cannot be deleted.

IMAP
Internet Information Access Protocol (IMAP) is a new protocol superior to POP. Like POP, IMAP can also download mail, delete mail from the server, or ask if there is any new mail. However, IMAP overcomes some shortcomings of POP. For example, it can determine how the client requests the mail server to submit the received mail, and request the mail server to download only the selected mail instead of All mail. The client can read the title of the message and the name of the sender before deciding whether to download the message. Through the user's client e-mail program, IMAP allows users to create and manage mail folders or mailboxes, delete mail, and query some or all of the contents of a letter on the server. To complete all these tasks, it is not necessary to download mail from the server to the user's personal computer.
Select and insert a "Connect Mailbox" command under the "IMAP" directory in the "Network" command area. The command will use the IMAP protocol to connect to the specified mailbox and support subsequent mail collection operations.

The command has the following attribute: the attribute of "server address" fills in the IMAP server address of the mailbox, the attribute of "server port" fills in the IMAP protocol port number, and the attribute of "SSL encryption" selects "Yes". These three information have been obtained in the QQ mailbox settings in the previous step, where the server address is imap.qq.com, and the port number is 993; For the "Email account" attribute, fill in the email login account to receive emails; Fill in the email authorization code for the "Login Password" attribute; For the "Email Address" attribute, the email address to be received is filled in by default; For the "Output to" attribute, fill in the variable name objIMAP. This variable will save the mailbox object obtained after connecting to the mailbox. This mailbox object will be used for subsequent commands such as obtaining the mailing list, deleting the mail, moving the mail, finding the mail, and downloading attachments.
In addition, you need to pay attention to the two attribute "login account" and "email address". For an ordinary QQ mailbox, the two values are the same, while for a VIP QQ mailbox, the two values are the QQ number corresponding to the Login Account and the VIP email address corresponding to the Email Address, as shown in the following figure:

"Login Account" and "Email Address" are two attribute. It should be noted that in many domain computer environments, "Login Account" may correspond to domain users.
There is a attribute "mailbox folder" that must be known when an email is retrieved, deleted, moved, or searched. How do you know it? Some people say that you can directly log in to the mailbox and have a look, as shown in the following figure, taking QQ mailbox as an example:

Are the "Inbox", "Draft Box", "Sent", "Deleted", "Trash Box", "My Folder", "Test", etc. as shown in the figure above, the "Mailbox Folder" attribute we need to fill in? Let's use a command to get a list of mailbox folders (mainly for auxiliary purposes, providing available values for mailbox folder attribute of other commands), and see what the output result is?

It doesn't seem right. The "My Folder" seems to be missing. In fact, "My Folder" here corresponds to "Other Folders", "Inbox" actually corresponds to "INBOX", and "Sent" actually corresponds to "Sent Messages". Based on the e-mail protocol, the message information obtained will be different from what is actually displayed on the interface (Web and mail clients will perform optimization processing when displaying). If you debug the command "Get Mail List", enter "My Folder" at the attribute of "Mailbox Folder", you will see the error message "Folder not exist". If you change it to "Other Folder", you will not report an error. This is just an example of QQ mailbox. In fact, different mailbox servers have their own access requirements and message return formats, which are difficult to unify. Therefore, please use the "Get Mailbox Folder List" command more to get the specific mailbox folder list information, which shall prevail. If "Yes" is selected for the attribute "Original Message", the output is the original message information. If "No" is selected, the output is the folder list information extracted based on certain extraction rules (some mailboxes do not support this extraction rule). Get the original message information of QQ mailbox folder list as shown in the following figure:

We can already know the mailbox folder information, and then we will focus on the usage of the three commands "Get Mail List", "Find Mail", and "Move Mail", which are also the key differences from the POP protocol:

As shown in the figure above, the attribute area of the "Get Mail List" command supports the Settings of "Only Unread Messages" and "Mark as Read", which is more flexible than the POP protocol. The field structure of the elements in the output array is also slightly different from POP, that is, the mail object of POP is different from that of IMAP.

As shown in the figure above, it is the attribute area of the "Find Mail" command. You can specify mailbox folders and search keywords (retrieve mail header information: subject, sender, recipient, and cc) to search for mail. The returned result is an array. If no mail is retrieved, an empty array is returned. If one mail is retrieved, there is only one element in the array. If more than one mail is retrieved, there are multiple elements. The "Character Set" attribute takes the default value. It needs to be adjusted only when encountering inconsistent encoding of the mailbox server.

As shown in the above figure, the attribute area of the "Move Mail" command depends on the "Mailbox Object" and "Mail Object" (the same as the "Download Attachment" command). After specifying the target mailbox folder, the specified mail can be moved to the specified mailbox folder. The POP protocol does not have this function.
System operation
System commands
Laiye Automation Platform provides some practical commands to call relevant functions of the operating system, such as playing sound, reading and Settings environment variables, executing command lines and PowerShell, and obtaining the folder paths of the system and users. These operating system related commands (referred to as "system commands") can be used together with other commands to enhance your automated process.
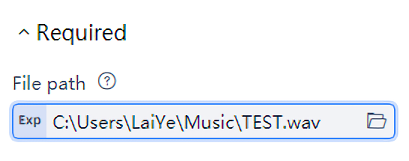
First, we try to find and insert a "Play Sound" command, which can play the sound file of the specified file path. This command has only one attribute: "File Path" attribute. This attribute fills in the full file path of the sound to be played. At present, Laiye Automation Platform only supports voice playback in wav format.
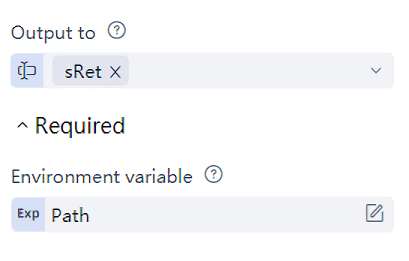
Select and insert a "Read Environment Variables" command under the "System" command Category of "System Operation", which can read the environment variables of the Windows operating system. The command has two attribute: "environment variable" attribute, fill in the name of the environment variable; The "Output to" attribute fills in a variable name, which will save the value of the read environment variable. Note that the "Read Environment Variables" command can only read one variable at a time. If you need to read the values of multiple environment variables, you can call the command multiple times. In addition, the text format of the environment variables read out is completely consistent with the text format of the environment variables in the operating system. If you need to further analyze the environment variable text, you can use Previous chapter Learn the relevant commands of data processing. The "Settings Environment Variable" command is similar to the "Read Environment Variable" command, and will not be explained here.
Under "System" command Category in "System Operation", select and insert a "Execute Command Line" command, which can execute Windows script. The command has two attribute: "Command Line" attribute, fill in the Windows script to be executed; "Output to" attribute, fill in a variable, which saves the execution result of the script. For the writing method of Windows script, please refer to relevant document.

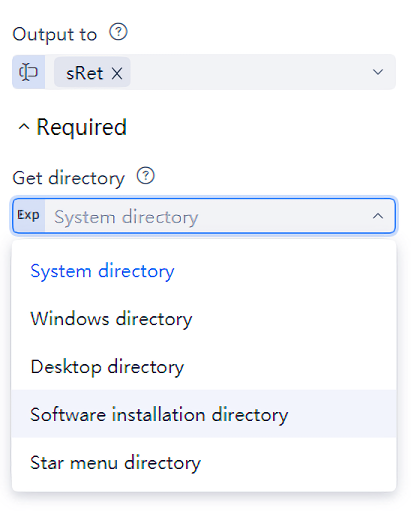
Under the "System" command Category of "System Operation", select and insert a "Get System Folder Path" command, which can get the path of each system folder. The command has two attribute: "Get Directory" attribute. At present, Laiye Automation Platform supports the following paths: system directory, Windows directory, desktop directory, software installation directory, and start menu directory, which users can choose as needed; The "Output to" attribute is used to fill in a variable that stores the execution result of the "Get System Folder Path" command, that is, the last path obtained.
The command "Get Temporary Folder Path" and "Get User Folder Path" are similar to the command "Get System Folder Path" and will not be repeated.
Application Command
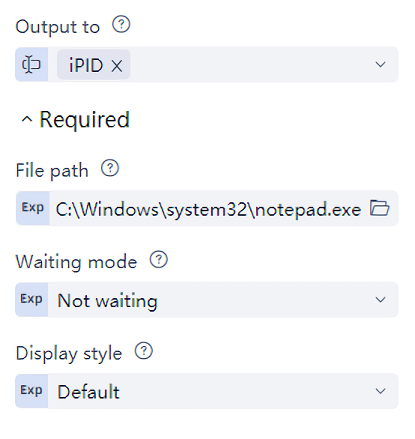
In enterprise business process, Applications may need to be started and closed. Of course, we can realize these functions through UI simulation. But in fact, Laiye Automation Platform provides a simpler and easier to use "application command", which can directly manage the life cycle of Applications, including starting applications, closing applications, obtaining the status of Applications, etc. First insert a "Start Applications" command. The attribute of the command is as follows: "File Path" attribute, fill in the file path of the Applications to be started; The "Waiting Mode" attribute refers to the waiting relationship between the system and the Applications. Laiye Automation Platform provides three waiting modes: "Don't wait", "Wait for the Applications to be ready", "Wait for the Applications to execute until exiting". "Don't wait" means that the target program starts immediately and the command is completed; "Waiting for the Applications to be ready" means that the command is completed only when the Applications is ready, otherwise it will wait all the time; "Wait for the Applications to exit" means that after starting the Applications, Laiye Automation Platform will wait until the Applications exits, and the command is not completed. The "Display Style" attribute refers to the display mode when the Applications is started. The display styles supported by Laiye Automation Platform include "Default", "Maximize", "Minimize", and "Hide". "Default" means that the Applications starts in the default display mode, "Maximize" means that the Applications window is maximized at startup, "Minimize" means that the Applications window is minimized at startup, and "Hide" means that the Applications window is not displayed at startup. Finally, there is the "Output to" attribute. Fill in a variable that stores the PID (i.e. process ID) of the Applications after startup. This PID will be used in subsequent commands.
The "Start Applications" command opens an Applications, but in some scenarios, not only the Applications needs to be opened, but also the Applications needs to open a file or website. In this case, the "Open File or Website" command can be used. Several attribute of this command are roughly the same as those of the "Start Applications" command, but the only difference is the "File Path" attribute. Here, fill in the file path or web address to be opened.
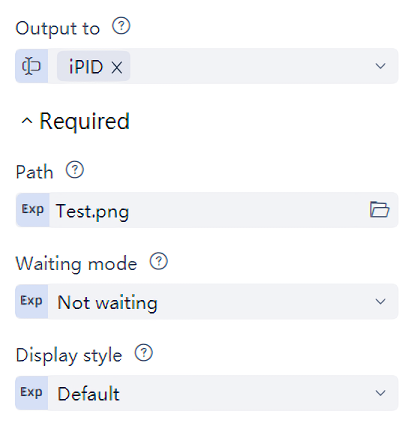
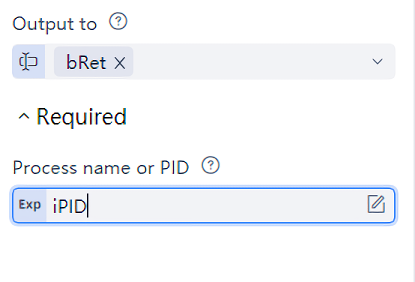
After launching the Applications through the "Start Applications" command or the "Open file or web address" command, we can check whether a specific application is still running at any time during the running of the process. Insert a "Get Application Running Status" command, which can judge whether a process is alive according to the process name or PID. There are two attribute of the command: "process name or PID" attribute, fill in the process name or PID of the application. If you fill in PID, it is the value obtained from the previous "Start Applications" command "Output to" attribute. If you fill in the process name, fill in the full file name of the Applications, for example, the process name of the previous "Start Applications" command is "notepad. exe"; The "Output to" attribute saves the execution result of the command. True indicates that the process is still alive, and False indicates that the process has been closed.
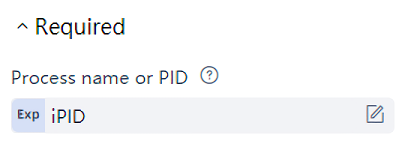
Finally, don't forget to close the Applications. Select and insert a "Close Application" command, which can close a process according to the process name or PID. The command has only one attribute: "process name or PID" attribute. Fill in the process name or PID of the application to be closed. The meaning is the same as the attribute with the same name of the command "Get Application Running Status".
Dialog box
In general, no manual intervention is required during the operation of RPA process. However, in some scenarios, the process needs two-way information communication with people. On the one hand, it informs people of the key information of the process, and on the other hand, it obtains people's control and decision-making information. To this end, Laiye Automation Platform provides a dialog box mechanism, which can not only display the key information of the process in a dialog box, but also pop up a dialog box for users to select and input, thus realizing the two-way information communication between process and people.
Select and insert a "Message Box" command under the "Dialog Box" directory of "System Operation" in the command center. This command will pop up a message box in the middle of the screen during the running of the process.
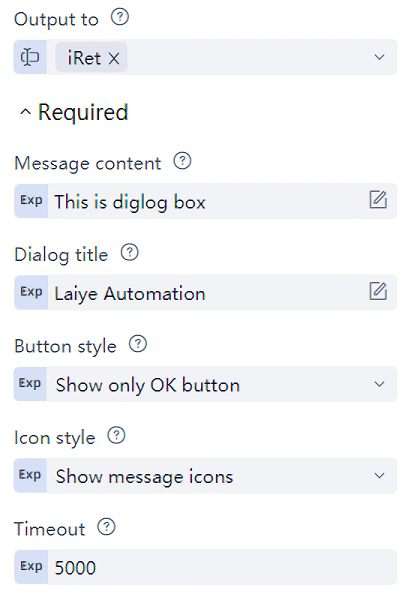
This command has the following attribute: the attribute of "Message Content" fills in the message content body; The "Dialog Title" attribute refers to the title bar of the pop-up dialog box; The button style attribute refers to which buttons are displayed in the dialog box. The button style attribute options include: "Display OK Only", "Display Yes or No Button", "Display Abort, Retry, and Skip Buttons", "Display Yes, No, and Cancel Buttons", "Display Retry and Cancel Buttons", and "Display Confirm and Cancel Buttons". According to the demand of the business scenario, Select the "Button Style" attribute reasonably;
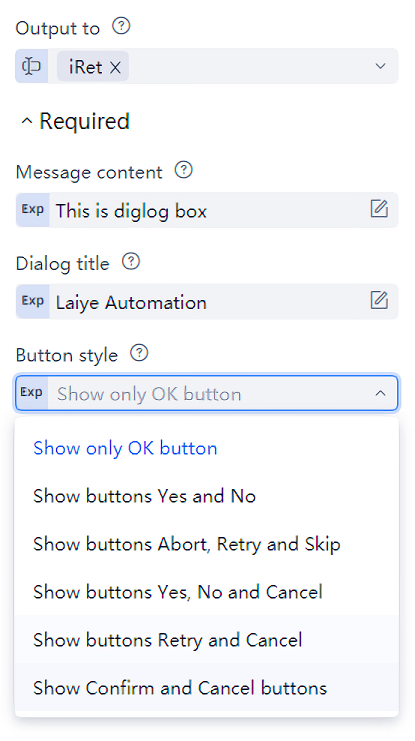
The "Icon Style" attribute specifies what icons are displayed in the dialog box. The options are: "Don't Display Icons", "Display Message Icons", "Display Query Icons", "Display Warning Icons", and "Display Error Icons". You can also reasonably select icons based on business scenarios; The "Timeout" attribute refers to the number of milliseconds after which the dialog box is forced to close. For example, filling in 5000 indicates that the dialog box will be forced to close even if the user does not click any button of the dialog box after 5000 milliseconds. If the "Timeout" attribute is filled with 0, Laiye Automation Platform will not consider the timeout, that is, the user must click the dialog box before the dialog box disappears; The "Output to" attribute fills in a variable, which will record which button the user clicks after clicking the dialog box button. The next process operation logic can select different process directions according to which button the user clicks. The values of each button are as follows:
| Value of the button | Meaning of the button |
|---|---|
| 1 | OK |
| 2 | cancel |
| 3 | abort |
| 4 | retry |
| 5 | skip |
| 6 | yes |
| 7 | no |
The Message Box command is a very powerful command. You can fill in the content, title, button style, icon style, etc. of the message box according to actual needs. However, sometimes such a complex dialog box or user confirmation is not required. Just pop up a simple message notification. In this case, you can use the "Message Notification" command. The "Message Notification" command will pop up a notification message in the form of a bubble. Even if the user does not do anything, it will disappear automatically in a few seconds.
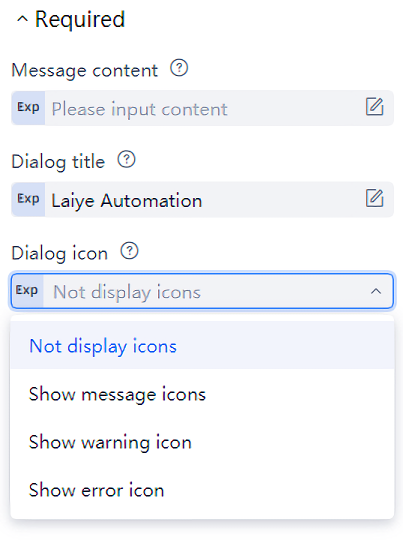
The Message Notification command has several attribute: Message Content, Dialog Title, and Dialog Icon, which have the same meaning as the Message Box command. It should be noted that the "message box" command usually stays for a few seconds before disappearing, but if the process ends running, the message box popped up in the process will also disappear. You can follow the "message box" command with a "delay" command for a few seconds, which will allow users to view the message box more fully.
The "Message Box" command and the "Message Notification" command enable the process to send messages to users. Although the "Message Box" command can get "which button the user clicks" to complete some functions of the user to send messages to the process, it is very limited. What if the user wants to send more information to the process? Laiye Automation Platform provides the "Input Dialog Box" command. This command can pop up a dialog box. The user can enter the information to be transferred in the dialog box, and this information will be transferred to the process.
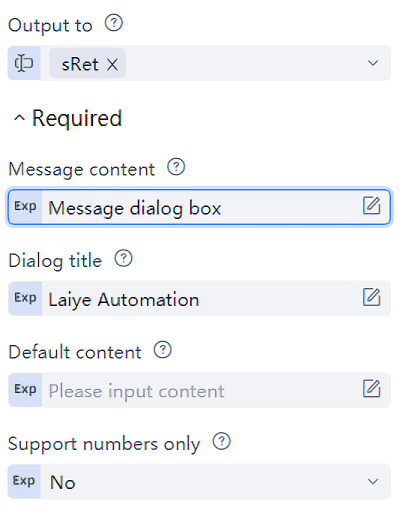
Let's take a look at the specific usage of the Input Dialog command. The meaning of the "Message Content" attribute and the "Dialog Title" attribute is the same as that of the "Message Box" command; The "Default Content" attribute is a prompt for the user. If the user does not modify it, the content in the "Default Content" attribute will be transferred to the process; The attribute "Only numbers are supported" is a Boolean value. "Yes" means that the user can only enter numbers. "No" means that the user can enter any character without restrictions; The "Output to" attribute fills in a variable. When the command is executed, the user's input information will be saved to this variable, which can be used in subsequent process, thus opening the channel for user input to the process.
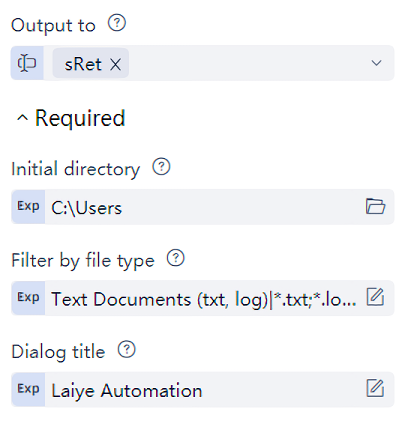
In addition to supporting user input text, Laiye Automation Platform also supports user input files. Insert a "Open File Dialog Box" command. This command can pop up a "Open File Dialog Box" during the running of the process. The user selects a file and passes the file path to the process. The command has several attribute: "Initial directory" attribute refers to the directory opened by default when the dialog box pops up. We can click the folder button on the right of the "Initial directory" attribute to select the initial directory. If no initial directory is selected (that is, the default value of the attribute is "") or the selected initial directory does not exist, Laiye Automation Platform will open a default directory as the initial directory. The "File Type Filter" attribute is a string that indicates which types of files can be opened in this dialog box. Please refer to relevant document for specific writing methods; The attribute "Dialog Title" has the same meaning as other dialog commands. The "Output to" attribute fills in a variable, and when the command is executed, the full path of the file selected by the user will be saved to this variable, that is, the "Open File Dialog Box" will not actually open the file, but will get the file path, which can be used by subsequent process, thus opening the channel for user input to the process.
The command "Open File Dialog Box (Multiple Selection)" and "Save File Dialog Box" are similar to the command "Open File Dialog Box". The command "Open File Dialog Box (Multiple Selection)" can select multiple files. This command returns an array of file paths. Users can traverse the array to process each file in turn. This will not be explained here.
Clipboard
The operation of the clipboard is very common in our daily work. It can migrate text or images from one Applications to another Applications. Of course, we can simulate operations such as copying and pasting the clipboard through the UI. More conveniently, Laiye Automation Platform can also directly read or Settings the text or image in the clipboard, making the clipboard truly part of the business process. We try to insert a "Settings Clipboard Text" command, which puts a piece of text into the clipboard. This command has only one "Clipboard Content" attribute, which obviously means the text content to be Settings to the clipboard.

We can then insert a "Read Clipboard Text" command to check whether the previous "Settings Clipboard Text" command succeeded. The "Read Clipboard Text" command also has only one attribute - "Output to" attribute. After running this command, the variable sRet filled in the attribute will save the text in the clipboard. Add a "Output debugging information" command and output sRet to check whether Settings and reading clipboard text are successfully executed.
In addition to transferring text through the clipboard, the clipboard can also transfer images. In the "Clipboard" directory of "System Operation" in the command center, select and insert a "Picture Settings to Clipboard" command, which will Settings an image file to the clipboard. This command has only one "File Path" attribute. This attribute fills in the path of the image file to be Settings to the clipboard.

We can insert a "Save Clipboard Image" command to check whether the previous "Picture Settings to Clipboard" command is successful. The "Save Clipboard Image" command has only one "Save Path" attribute, and this attribute fills in the save path of the image file in the clipboard.

Text writing screen
Text writing screen is a very interesting function. It can output a paragraph of text to the screen during the running of the process. No matter what is displayed on the screen, it will cover the displayed content. At the same time, the text space is transparent, and the original content of the screen can still be seen through these space areas. By writing text on the screen, users can see the necessary prompt information in a very striking way, but it has little impact on the operation of process.
Such a cool effect requires more than one command, but it is still very simple. Select and insert a "Create screen writing object" command under the "Text screen writing" Category of "System Operation" in the command center. Subsequent screen writing operations are performed on this object.
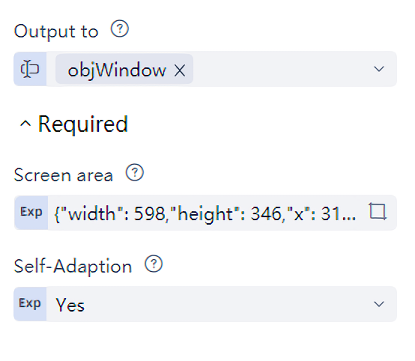
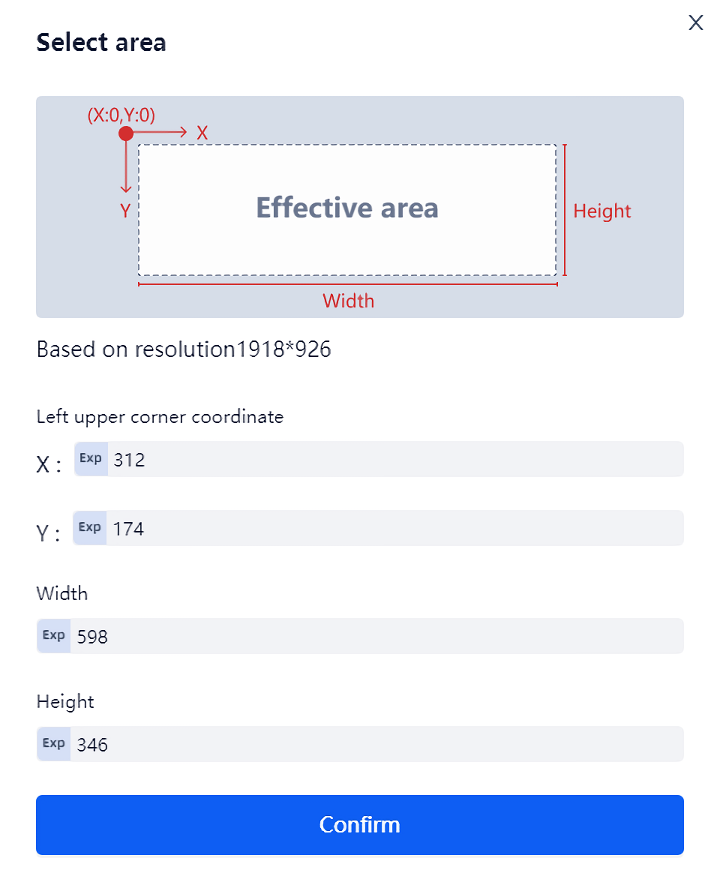
This command has three attribute: "screen writing area" is a dictionary type value, which indicates the area where the text is written on the screen. It doesn't matter if you don't understand it for the time being. Click the range selection button on the right of the screen writing area. At this time, the UI is covered with a curtain. Press and hold the left mouse button to start checking. When you feel that you have made a good selection, release the left mouse button, and Laiye Automation Platform will automatically select the screen writing area. For example, the area we just selected is based on 1920 × 1080 resolution, starting point coordinate (upper left corner) is (312174), height of screen writing area is 346, width is 598, and unit is pixel. The "adaptive" attribute is a Boolean value, indicating whether the screen writing area automatically adapts with the change of resolution. True indicates that the "screen writing area" attribute will automatically adapt with the change of resolution. False indicates that the screen writing is strictly in accordance with the value of the "screen writing area" attribute; Output to the "attribute" and fill in the screen writing object objWindow, which will be used in subsequent operations.
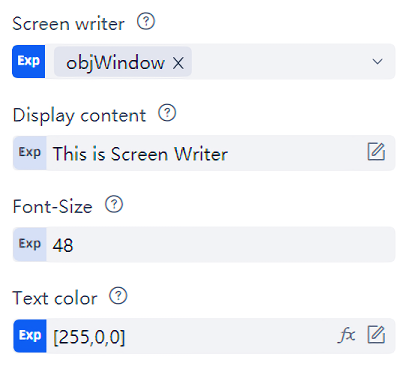
After creating a screen writing object, you can draw text with this screen writing object. Select and insert a "Draw Text" command, which will write a paragraph of text on the screen. This command has four attribute: "Write screen window object" attribute fills in the write screen object objWindow; The "Display Content" attribute fills in the text content to be displayed; "Text size" indicates the font size of the text; In the "Text color" column, use [255,0,0] Stands for red, [0,0,255] Represents blue, [255,255,0] It represents yellow, etc. For information about RGB color, see related tutorials.
Sometimes we need to write the screen many times. The screen writing object objWindow can be used repeatedly. After the previous "Draw Text" command, add another "Draw Text" command. The two "Draw Text" commands only have different attribute of "Display Content". After running, it is found that the text displayed by the previous "Draw Text" command does not disappear. It turns out that Laiye Automation Platform will not erase the screen writing content of the previous "Draw Text" command by default. If you want to erase the screen writing text, you need to use the "Clear Text" command. The Clear Text command has only one attribute, "Write Screen Window Object". This attribute has the same meaning as the "Write Screen Window Object" attribute of the "Draw Text" command. Fill in objWindow.
Run the process again. This time, the content of the last text is erased, but the text display time is too short. The original Laiye Automation Platform commands are all executed in real time. If you need text to stay on the screen for a period of time, just insert a "Delay" command between the "Draw Text" command and the "Clear Text" command.
Finally, remember that after all screen writing operations are completed, you must add a "Close Window" command, which corresponds to the "Create Screen Writing Object" command one by one to release the objWindow object created by the "Create Screen Writing Object" command.
Lock screen and unlock
When we use Laiye Automation Platform to run a process on an ordinary desktop computer (in some materials, this situation is also called "desktop automation" or "manned automation"), we often encounter such situations: we need to leave the desk temporarily when we have something to do, but we don't want others to tamper with the computer, disrupt the execution of the process, or don't want others to see the current process. We want to lock the screen, such as pressing the "Win+L" key in Windows. But can Laiye Automation Platform's process work normally after this screen locking method is adopted? Let's use a specific example to experiment. This example has only one process block. Execute a "Screen OCR" command to get the text of the "Recycle Bin" icon on the desktop and display it. To reserve the time to press the "Win+L" key, we add another "Delay" command, delaying 5 seconds.

First, execute the process normally, and correctly recognize the text "Recycle Bin":

Run the process again, immediately press the "Win+L" key to lock the screen, and then wait for the process execution to complete, enter the unlock password. At this time, Laiye Automation Platform does not recognize the text "Recycle Bin":

This is because the icon and text of the "Recycle Bin" are actually "drawn" on the desktop by Windows. The OCR command of Laiye Automation Platform needs to obtain the content of "drawn" by Windows to recognize it. But Windows will also be lazy. When the screen is locked, it will no longer "draw" these contents. Therefore, Laiye Automation Platform's OCR command will naturally not achieve the desired effect.
Is there any other way? Since version 5.0, Laiye Automation Platform has provided a command called "screen lock", which can lock the screen without affecting the normal operation of process. Let's see the specific usage:
In the command list of Laiye Automation Platform, find the "Lock Screen Unlock" Category of "System Operation", select and insert a "Screen Lock Screen" command, which will lock the screen without affecting the execution of subsequent process. This command has three attribute: "Output to" attribute returns whether the lock screen command is executed successfully, and this attribute is not used temporarily; "User or account" attribute fills in the user name of Windows system; The "Password" attribute is used to fill in the password of the user name. If you don't want others to see the original password in the input box and source code, you can click the "Switch to use ciphertext or plaintext" button on the right side of the password input box, and it will be ciphertext when you enter it again.
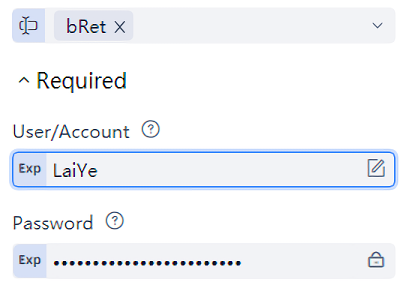
Similarly, insert a "screen unlock" command to unlock the screen. The three attribute of this command have the same meaning as the "screen lock" command. Between the "screen lock" and "screen unlock" commands, fill in the original commands (OCR identify screen commands, output debugging information commands, etc.). When running the process, the screen will be automatically locked, and the process is still in normal execution. After the execution is completed, the screen will be automatically unlocked, and the text "Recycle Bin" will be correctly recognized.
Isn't it amazing? Through the screen lock and unlock commands, you can lock the screen and run the process correctly, kill two birds with one stone, perfect! Don't worry. In order to support these commands, the Windows system needs to make some Settings in advance:
First, the Windows system needs to support remote desktop connection, which is a prerequisite, because these two commands actually use the Windows Remote Desktop Protocol (RDP). Generally speaking, the home version or educational version of Windows does not support RDP, while the enterprise version and flagship version all support RDP.
Second, the Windows system needs to enable the remote desktop connection. The reference of enabling method is as follows:
1. Right click "This Computer" or "My Computer", click "attribute", and in "Advanced System Settings", click "Remote Desktop" or "Remote" tab.
2. Under the Remote Desktop or Remote tab, select Allow remote connections to this computer.