UI elements automation
As we have learned in the previous chapters, A major feature of RPA is "non-invasive", that is, although RPA works with other software, it does not need other software to provide interfaces. It is directly aimed at the operation UI of other software to simulate human reading and operation. However, there are many input boxes and buttons on the general software interface. How can the computer know where we want to operate? The "UI elements" and "UI elements automation" described in this chapter will solve this problem.
UI elements
If you have a certain computer foundation and know what is "control", sorry, please forget this concept for the time being. Because "control" and "UI elements" have common points, but they are not exactly the same, we must try to avoid conceptual confusion.
In addition to computer experts, most people are dealing with the graphic user interface of the operating system when using computers. Whether it is Windows or Mac OS X that are commonly used, or Linux that is not commonly used by non IT personnel, it has its own graphic user interface. With the popularity of web browsers, more and more graphic user interface are displayed on browsers. These graphic user interface have their own characteristics, but when we click with the mouse, there is actually a small graphical component under the mouse. We call these graphical components "UI elements".
For example, the following figure is a common Windows window and a typical graphical user UI. What are the UI elements in this window?
First, all the options in the menu bar above, such as "file", "home", "share" and "view", are independent UI elements. The icons in the menu bar and the text below, such as "copy" and "paste", are independent UI elements. The "quick access", "desktop" and "download" in the left navigation bar are independent UI elements; Of course, each file displayed in the main area of the window (the range covered by the red box) is also an independent UI elements.
There is also a nested combination relationship between UI elements. For example, the red box contains a large UI elements, and each file in it is an independent UI elements.
In Laiye Automation Platform, the role of UI elements is to act as" Targeted " In the command of target use.
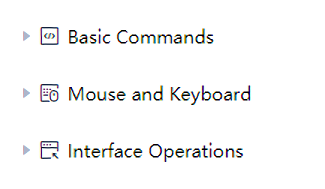
Above It is mentioned in that Laiye Automation Platform has placed many commands in the command area as "pre-built components". Among them, the most basic ones are shown in the figure:
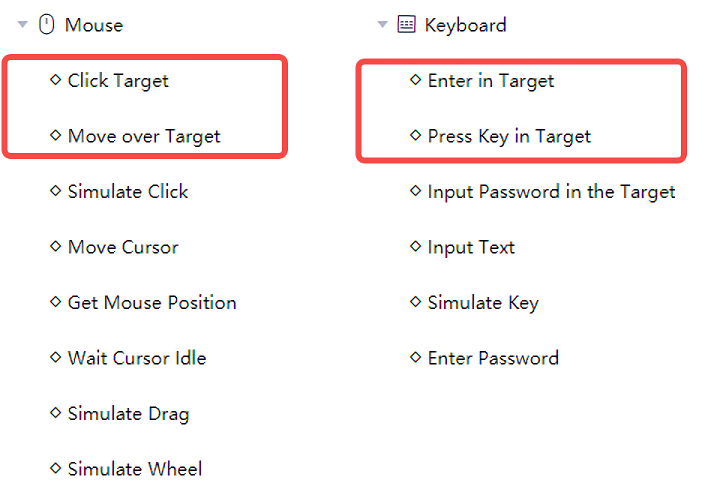
Among them, under "UI elements" and "text" categories All Orders are all purposeful; The commands under "mouse" and "keyboard" that contain the word "target" also have targets. As shown in the red box below.
So-called Targeted That is, a UI elements is specified in the command. When running, it will first find out whether this UI elements exists. If it exists, the operation will be performed on this UI elements. For example, if the UI elements is a button, the command "click target" is to click this button. If it does not exist, it will search repeatedly until it exceeds the specified time (also known as "timeout". The timeout can be Settings in "attribute"), an error message will be output, and the process will stop running directly.
On the contrary, for Targetless You do not need to specify the UI elements in the command. For example, the "simulate click" command has no target. When it is running, you can click on any position where the mouse is currently. It is impossible to verify what was ordered; Another example is that the "simulate key" command has no target. When running, the input focus of the keyboard is at what position to simulate a key operation. It is impossible to verify where the input went.
Obviously, when using Laiye Automation Platform, you should give priority to using targeted commands, because targeted commands specify the object of operation and will be more accurate. Only when the target can't be found, it will take the second place and use the command without the target.
Therefore, when using Laiye Automation Platform, how to accurately select a target is crucial. As long as the target is accurately selected, the simulation operation is relatively simple. The following describes the method of selecting targets.
Target selection
Laiye Automation Platform provides a fully automatic way to select a target. We take the "click target" command in the "mouse" category as an example to illustrate.
Suppose we want to execute the simplest process. This process has only one step: click the start menu button of Windows (the default position is in the lower left corner). First, create a new process, and then open the only process block. Then, find the command "Click a target" in the "command area" of the "visualization" view, and insert it into the assembly area by dragging or double clicking. You should be familiar with the above steps. If you are not familiar with them, please go back and read them Basic concepts This chapter.
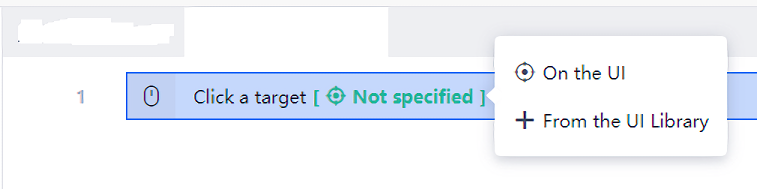
In the assembly area, there is now a command. We will notice that there is an icon like a sight on this command, and the text "unspecified" is also on the right side. The meaning of both is actually "the target has not been specified". Move the mouse over this icon and a menu will pop up automatically. There are two options: "On the UI" and "select from UI Library". As shown in the figure below:
Click "On the UI", and the UI of Laiye Automation Platform is temporarily hidden. A translucent mask with red edge and blue background appears, which we call "target selector". Where the mouse moves, the target selector will appear. Until we click the left mouse button, the target selector disappears and the UI of Laiye Automation Platform reappears. When the mouse is pressed, the UI elements covered by the target selector is the target we selected.
As mentioned above, UI elements may be nested, and the mouse position may have fallen within the scope of multiple UI elements. At this time, the target selector will automatically select the UI elements that you most likely need and mask it. Therefore, before pressing the mouse, please move the mouse patiently until there are no more or less target selectors Exactly Cover the UI elements you want to operate. On the top of the target selector, Laiye Automation Platform will also display the type of this UI elements, such as a button or an input box. This information is also used to help you determine whether to Exactly Selected the UI elements you need. Because many complex UI often have multiple UI elements that are very close together, and only one of them may be the one you really want to be the "target", so you should carefully identify and make no mistake.
We can try to cover the start menu button with the target selector. Note that it is exactly, no more or less. When the mask changes to the state shown in the following figure, left click to complete the selection. Of course, the following figure is what it looks like in the Windows 10 operating system. For other versions of Windows operating system, the appearance may be different, but the principle remains the same.

Once the target UI elements is selected, the UI of Laiye Automation Platform will reappear. For the "mouse down" command just now, the sight has become the name of the UI elements (the name is automatically taken by Laiye Automation Platform, and you will learn how to change it later). Move the mouse up, and a floating window will display thumbnails of UI elements. This thumbnail is for reference only, to help you remember which target you just selected, without any impact on the operation of the process. There is also a "re On the UI" button below the thumbnail. After pressing it, the function is the same as that of "Selector" just now. If the target you selected earlier is not suitable, or you accidentally selected the wrong one, press this button to start again.
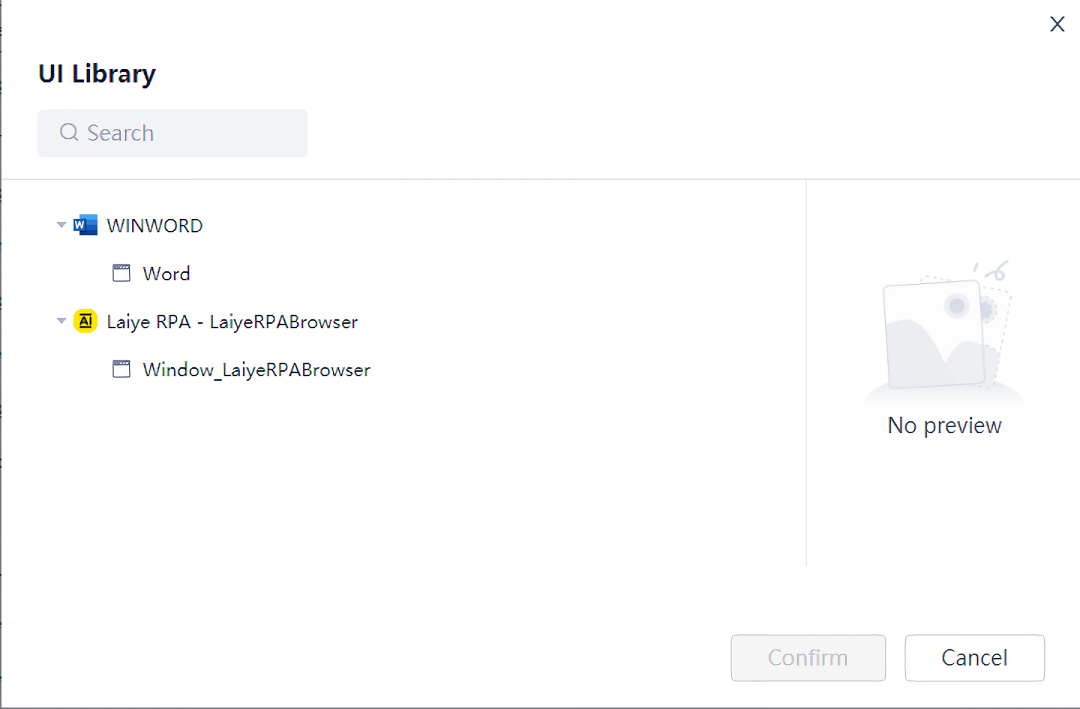
At the same time, Laiye Automation Platform will automatically save the selected UI elements into a "UI Library". If Same process If you need to use this UI elements again in any process block of, you don't need to choose it again. Find "select from the UI Library" on the command, and click it to directly select the one you need from the multiple UI elements saved in the interface library. Note: each process has its own "UI Library". Multiple process blocks of the same process can share the same UI Library. The UI Library will not be shared between process and process.
If you have experience in application development for Windows (if not, it's OK. This paragraph can be skipped without affecting subsequent reading), you will know that there are actually many development frameworks for Applications on Windows, including SDK, MFC, WTL, WinForm, WPF, QT, Java, etc. if you add in Web applications running in IE and chrome browsers, there are more types. In fact, these Applications provide interfaces for finding and operating UI elements. Technically, Laiye Automation Platform is nothing more than calling these interfaces. However, the calling methods of these interfaces are different, even very different. Even it experts can hardly master all these interfaces in a short time, let alone ordinary users.
However, if Laiye Automation Platform is used, they are all the same "UI elements", and there is no difference in finding and operating them. For example, there may be a button in the MFC program and a button in the Chrome browser. They all look like buttons, but the technical difference between simulating clicks on these two buttons is almost world-wide. In Laiye Automation Platform, you don't need to care about these differences at all. Laiye Automation Platform has smoothed them out for us. Thus achieving the unity and balance of "powerful", "simple" and "fast".
Target editing
In the previous section, we saw that the target selector of Laiye Automation Platform works automatically. As long as we move the mouse over the UI elements that we want to be the target, the mask will cover the UI elements exactly, and generate a piece of data. When Laiye Automation Platform is running, we can find the target with this piece of data.
Of course, any automatic work will inevitably make mistakes. When using a target selector, common problems are:
- No matter how you move the mouse, you can't make the mask cover the UI elements to be the target (usually the mask is too large and covers the whole window)
- The mask can exactly cover the UI elements, but when the generated data is used to Selector, the following occurs:
- Wrong choice: we can find the UI elements, but the UI elements we found is not the one we selected originally
- Missed selection: the UI elements we selected originally obviously exists, but it can't be found
As for the first situation, that is, the situation where the target cannot be covered, we will spend more space on it in the next chapter. Here, we mainly discuss the second situation, that is, when the target can be covered, but there is a mistake or omission in the operation. Let's explain why this happens first, and then see how to solve it.
Now, please give it a try, click here Open a table. This table is invented by the author. It is an "employee information table", in which there are five imaginary employees. In the third column of the table, that is, the "salary" column, the salary of employees is displayed (of course, it is also imaginary). As shown in the figure below:
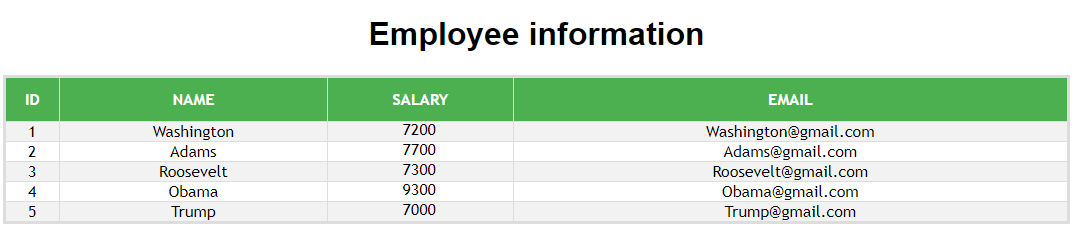
We can try to use Laiye Automation Platform to find the third employee, that is" Roosevelt " The cell where the salary of is located (marked with a red box in the figure above. The array in the cell is randomly generated and may be different from the value displayed in your browser), and let Laiye Automation Platform automatically control the mouse to double-click this cell.
This Task is so simple! Create and open a new process block in Laiye Automation Platform, drag a "click target" command under the "mouse" Category, and set the "click type" to "double click" in the attribute bar. Other attribute remain unchanged by default. Then, with the function of "On the UI", select" Roosevelt " Take the cells in the row "salary" and column as the target of the command, and the Task is completed. When running the process, you can see that the mouse automatically double clicks the target cell, and the text in the cell becomes selected due to double clicking.
But don't be too happy too soon. Try to refresh this page, and then run the just written process. This time, the operation of the process will fail, and the UI elements cannot be found in the report. The UI elements clearly exists, but it cannot be found, which means "missing selection".
Why is this?
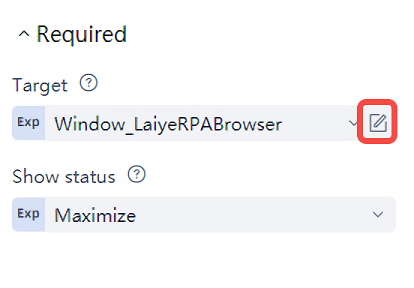
If we pay a little attention, we will find that among the attribute of the command just dragged, there is a attribute called "target". When we have not selected a target, the content of this attribute is "unspecified". After the target is selected, the content of this attribute will become the name of the target UI elements. When the target clearly exists but can't be found, it is obvious that there is something wrong with the "target". It is not difficult to find that on the right side of this attribute, there is also a button in the shape of "paper and pen", which we call "Edit", as shown in the following figure:
Click "Edit" to pop up a dialog box showing some details of the target UI elements, as shown in the following figure:
When you first see the contents of this dialog box, you may be confused because it looks a little complicated. Don't be impatient. Let's analyze it slowly in the way of step-by-step.
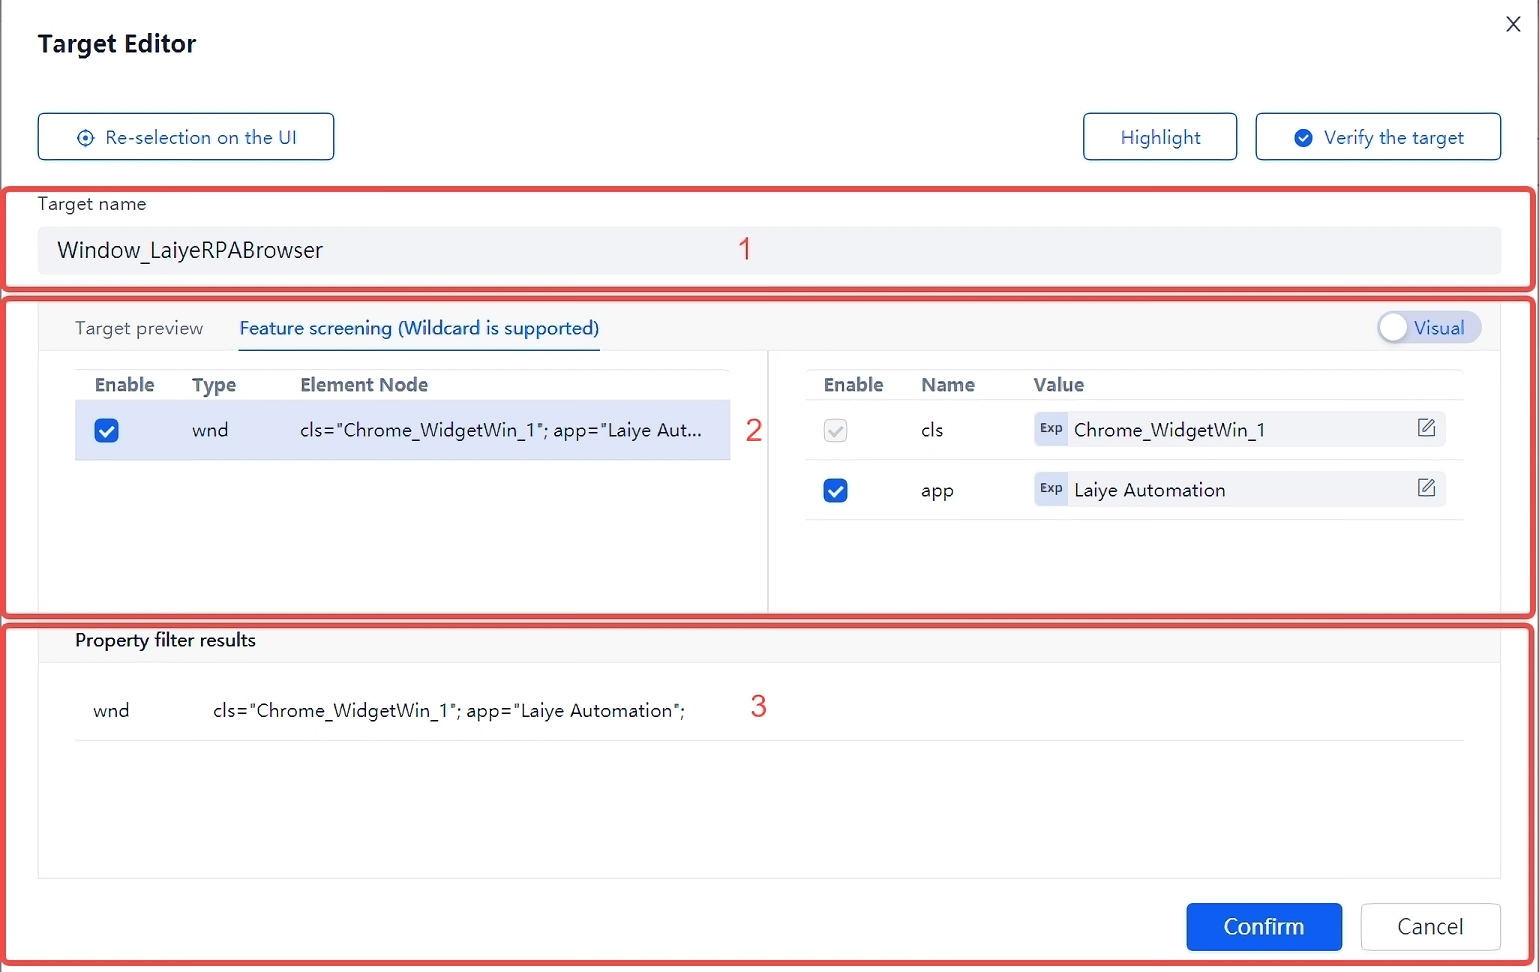
We divide this dialog box into three main areas, which are represented by areas 1, 2 and 3 in the figure above. In addition to these three areas, the remaining buttons are easy to follow the name.
Area 1 is mainly the name of this UI elements. As mentioned earlier, this name is automatically created by Laiye Automation Platform. You can modify it here.
Area 3 actually describes some of this interface" features ", This feature is divided into several groups, and each group contains a series of attribute and values. For example, in the figure above, the group in the third row is called html , It also contains three attribute, namely tag , parentid , aaname , The values of these attributes are in order:" DIV ", " employee "And" 6800 "When Laiye Automation Platform judges whether a UI elements exists, it will look for all attribute and values in all groups. Only when All The UI elements is considered to exist only after matching.
In fact, when Laiye Automation Platform describes the characteristics of a UI elements, there are many alternatives. It will automatically find out the appropriate group and its corresponding attribute and value from these alternatives. In area 2, Laiye Automation Platform will list all the alternatives one by one. If it is checked in the front, it means that a group or a attribute will be selected as the feature of the UI elements. The value here can also be modified to any value you want, even a variable or expression, or an asterisk wildcard (i.e * Symbol) to represent a string of arbitrary length.
You may notice that there is a aaname Attribute of whose value is" 6800 ". it is the" culprit "of the" missed selection "just now. Because you can roughly guess that this attribute represents the text content of the cell. Treating the text content as a part of the characteristics of the UI elements is certainly helpful to find the UI elements, but the above" employee information table "is special. Every time it is refreshed, its content will change. If you still set the aaname Attribute of and" 6800 "If this value is taken as a part of the feature, it will be like" disregard the changing circumstances ". If the table content changes slightly, it will not be found.
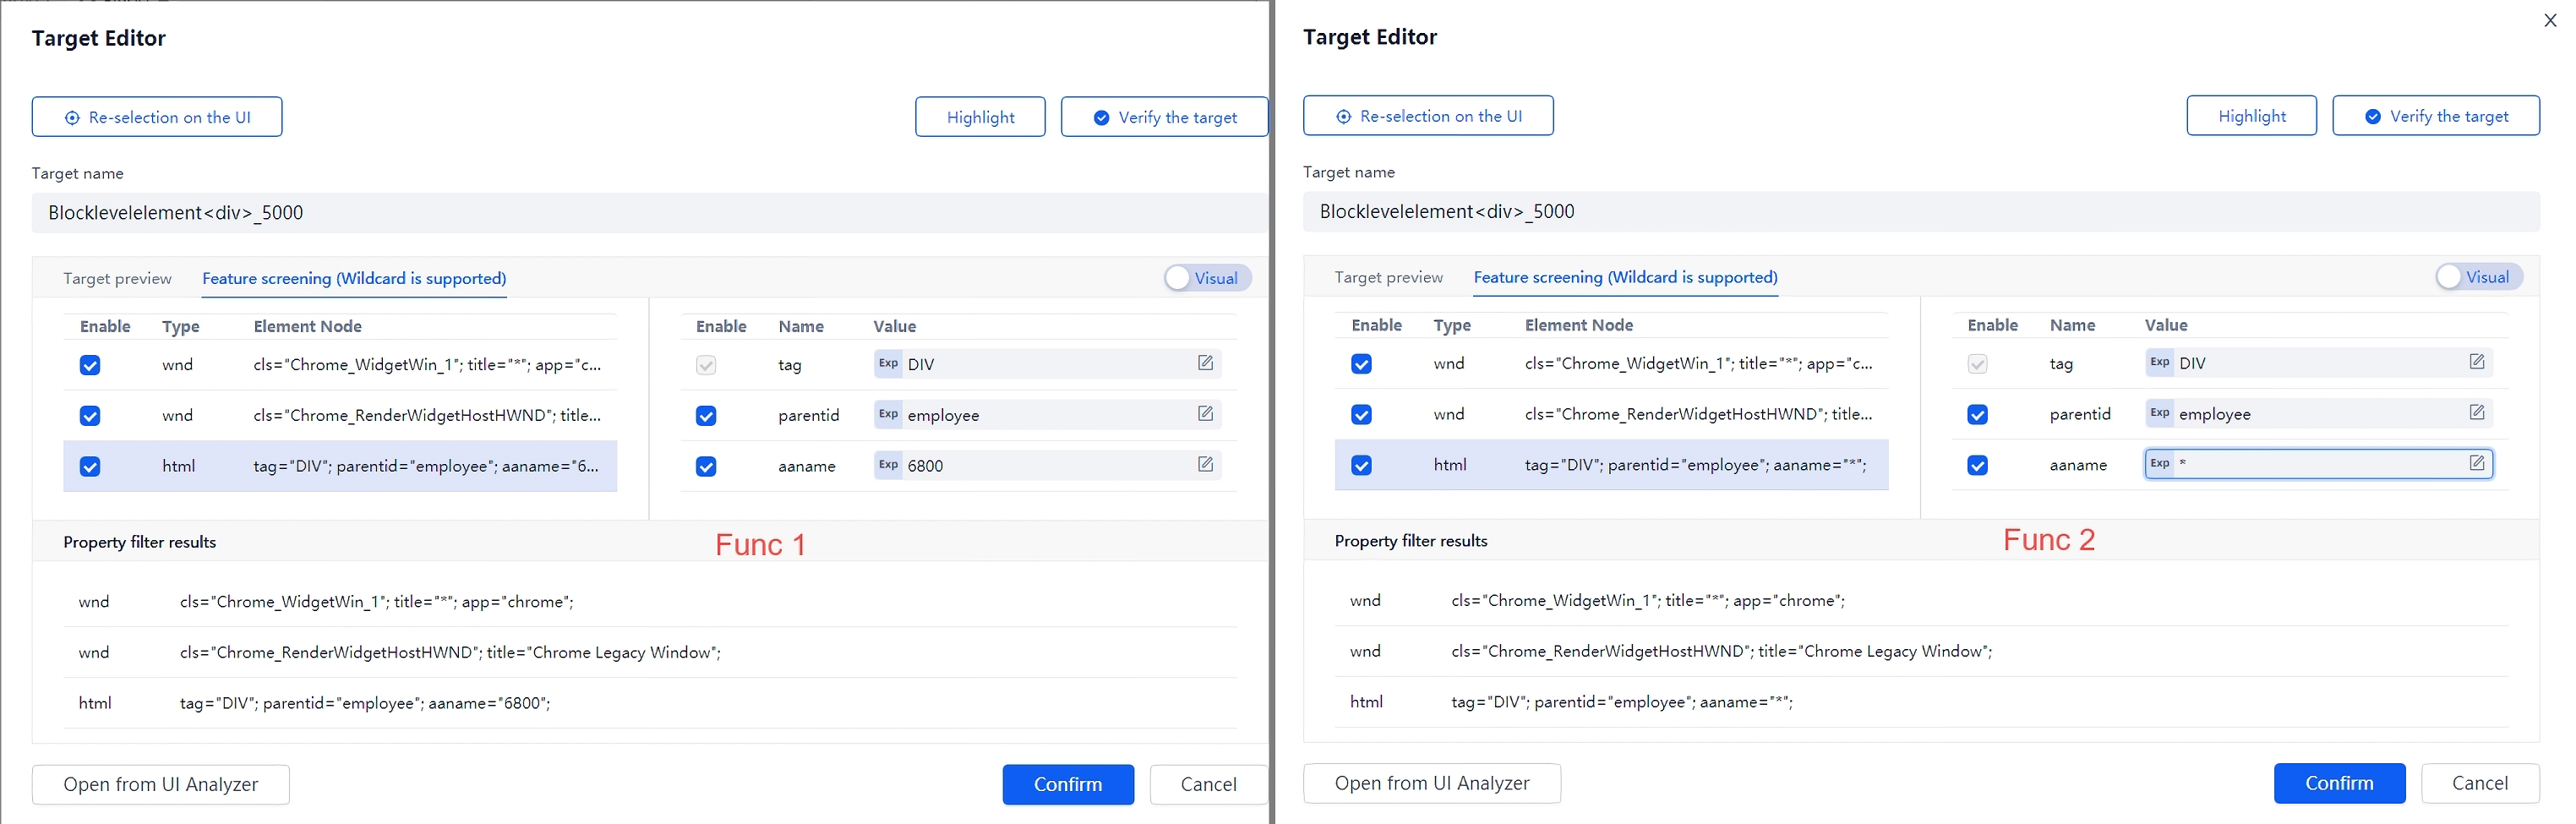
Then what shall I do? The usual practice is to remove the attribute that may cause "missing selection" from the features of UI elements. There are two methods to remove this attribute, one is to cancel the check status of the selection box in front of the attribute, and the other is to change the value of the attribute to an asterisk wildcard (i.e * Symbol). As shown in the figure below:
We can actually try, using any of the above methods aaname Remove the attribute, and then run the process. It is true that no error will be reported this time, but double click the first line (that is" Washington " That line). This is a typical "wrong choice".
The reason for the "wrong selection" is that there are five employees in the "employee information table". The UI elements features in the salary column include: aaname Except for the attribute, everything else is the same. So after removing this attribute, Laiye Automation Platform will find first UI elements conforming to this feature, that is" Washington " The salary column of this row.
Therefore, when "wrong selection" is caused, other attribute need to be added to make up for it, so that Laiye Automation Platform can avoid "wrong selection". How to add other attribute? We will talk about it later when we introduce "UI Analyzer".
In a word, if the UI elements is complex, or the characteristics often change, it still needs some skills to accurately edit the target without mistakes or omissions. Unfortunately, there are no specific rules in this area, so we can only try more and accumulate experience. Here are some public experiences. Please remember them first, and then summarize your experience in practice.
- Some feature names may not be understood for the time being, such as
cls,tagWait, I can ignore them temporarily; - Make good use of wildcards
*, This wildcard represents "match anything". For example, there is a UI elementsaanameThe value of the attribute is "Name: Zhang San". The following "Zhang San" may change, but the previous "Name:" does not change. So, I can use"Name:*"To avoid "wrong selection"; - Be careful when removing features. Because removing features can reduce missed selection, but it will increase false selection. During the operation of the process, it is easy to find the missing selection, but the wrong selection may not be found immediately.
On the last point, it is worth noting that when Laiye Automation Platform runs a process, most "targeted" commands throw an exception when they can't find the target (unless it's a command like "judge whether the target exists"). The process will stop immediately and report an error (unless you use try... Catch to catch the exception, please refer to the following for specific usage). So it's easy to find. When a wrong choice occurs, Laiye Automation Platform does not know that it will continue to run, so it is not easy to find the error.
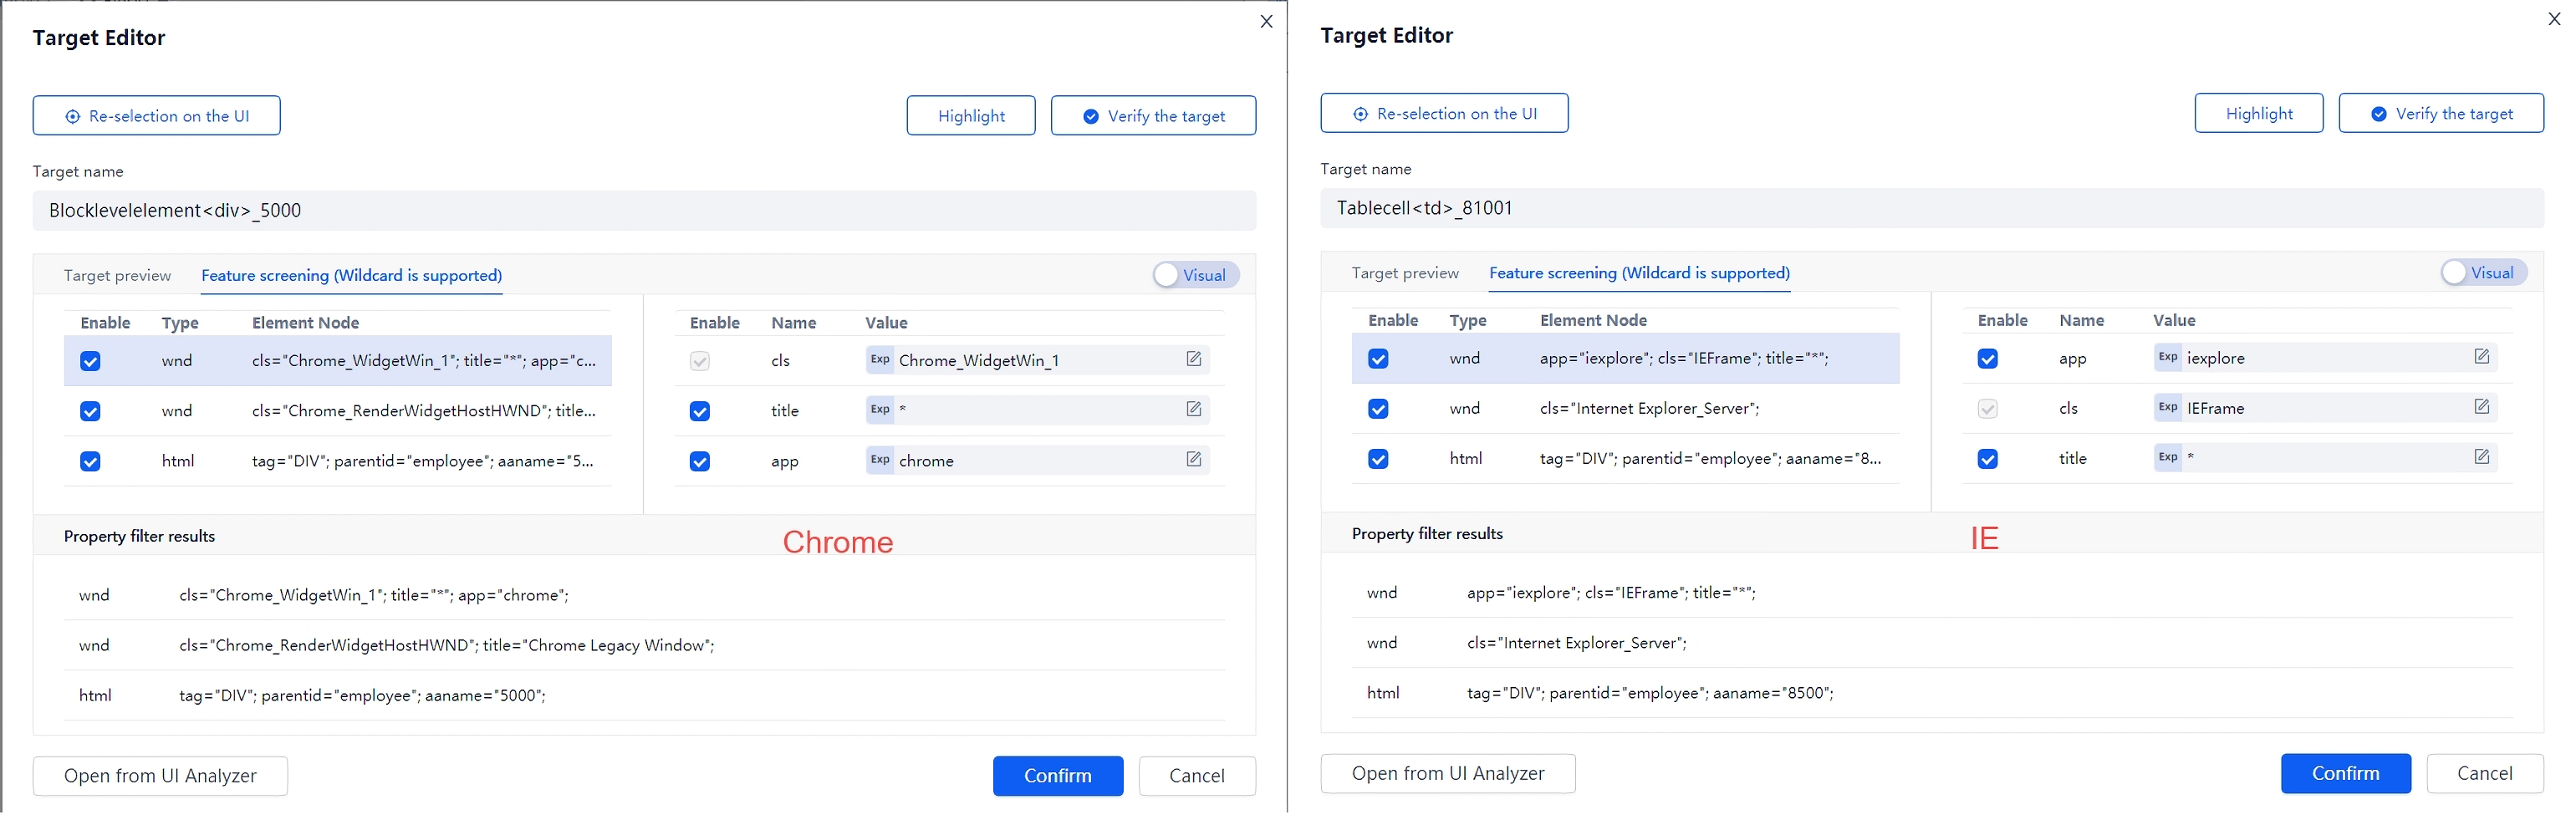
Finally, it should be reminded that the same UI elements may have different characteristics in different operating systems and browsers. In particular, when chrome and IE browsers display the same page, the same UI elements may have completely different characteristics. As shown in the figure below, also open it with chrome and IE a same webpage and select a same UI target , Its characteristics are quite different.
Therefore, when making process with Laiye Automation Platform and using them on other people's computers, please try to keep the consistency between the development environment and the production environment to reduce unnecessary errors.
UI elements operation
The command list of UI elements provided by Laiye Automation Platform is shown in the following figure.
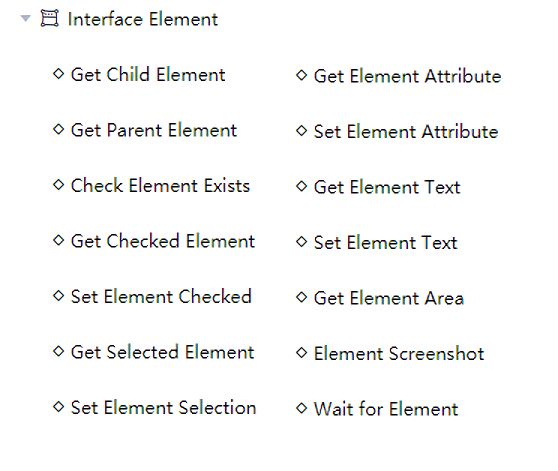
Many beginners of Laiye Automation Platform are often at a loss when facing such a complicated command list. In fact, there is no need to memorize these commands. As long as you master some skills and deeply understand the design concept of Laiye Automation Platform, you will find that there are some general principles. When you master these principles, you will naturally have a command in your mind when facing a specific problem, and you can probably guess what attribute this command should have, what values each attribute can have, and what the meaning of each value is, Let's learn about it.
Above As mentioned, the operation of UI elements can be realized by command In addition to the command itself, the attribute of the command is also an indispensable part of the command. It can even be said that only when the key attribute of the command are described clearly can a command be called a complete command. Generally speaking, the command consists of the following parts:
Command = (For what)+(With what)+(What to do)+(What's the result)
"To what?" , It refers to the operation object of the command, which is what we said in this section target , For UI elements, the operation objects include radio box, multi selection box, text box, list box, drop-down box, etc. We have learned earlier that the operation object of the command can be determined through the "On the UI" function of Laiye Automation Platform.
"What to do" , Refers to the operations that can be performed on the target. Generally speaking, the operations that can be performed on the target are determined by the type of the target itself. After the target is determined, the operations that can be performed on the target are basically determined. Such as buttons" click " It is an operation that can be performed, but the text property can't be clicked generally; Another example is the operation of a radio box. One is to obtain its selection status (checked or unchecked) and the other is to Settings its status (checked or unchecked). There are also some general operations that are common to almost all UI elements, such as obtaining the size, position, text, etc. of UI elements.
"With what?" , It refers to what information the user needs to provide when operating on this target. This also depends on the type of the target itself. For example, when Settings the status of a radio box, a Boolean value (true or false) should be passed in. There are also a few commands that can be executed without the user providing additional information, such as Get element text Command, as long as you tell the target of this command, you can get the element text without other information. For readers with programming experience, "what to use" is a bit like programming Parameter , If no additional information is required, it is equivalent to that in programming Parameterless call Function.
"What's the result?" , It means that some commands also have an "output value". For example, get the element text, and output the element text of string type; For example: Get element selection Command. When the UI elements is a multi selection box, the output is an array (because the user may have made multiple selections). For readers with programming experience, "output value" is equivalent to the "return value" of functions in programming.
It can be seen from the above description that, in essence, Laiye Automation Platform is a simulation of human operation, which encapsulates one operation into one command, and the key attribute of these commands are determined by the target. Therefore, you need to be very familiar with the simulated object, such as learning UI elements operation In this chapter, we should make some extra efforts to understand the basic knowledge of HTML property and DOM (document structure tree).
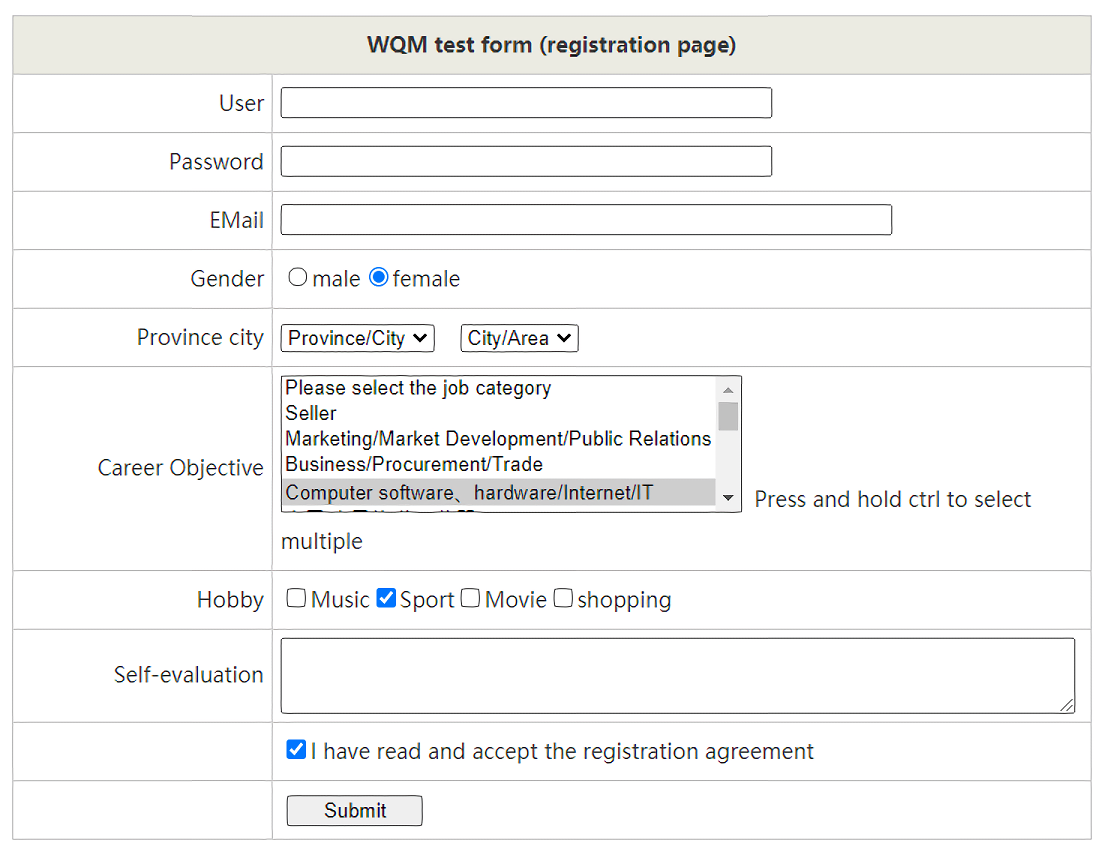
Let's start with a Specific UI , To demonstrate how to operate UI elements. In this UI, there are text property, single box, multi box, single line text box, multi line text box, list box, drop-down box, check box, etc., which basically represent typical UI elements.
Determine whether the element exists
As the name implies, "judge whether an element exists" can check whether a specific UI elements appears on the current screen, and output the check result to a variable. When the UI elements exists, true will be saved in the variable; otherwise, false will be saved.
When we need to judge whether a specific UI will appear after a certain step of the process is executed, this command is more suitable. A key element on the UI can be used as the judgment criterion. If this element exists, it indicates that the UI exists; otherwise, it indicates that the UI does not exist.
For example, let's judge whether there is a "submit" element in the test UI shown above.
- Drag the mouse to add "judge whether an element exists" to the visual view, as shown in the figure;

Click the "On the UI" button of "judge whether the element exists", switch to the test page, hover the mouse over the "submit" button, make the red border and blue box just cover the "submit" button, and click the left mouse button;
After running, the running result of this command will be output to the variable BRET, as shown in the figure above. We judge whether the result is true or false through a judgment statement: true indicates that the UI elements is found; False indicates that no UI elements is found;
Settings / get element check
"Settings / get element check" is used to automatically operate the UI, automatically complete form filling, automatic operation and other functions. The operation elements are mainly single and multiple selection boxes.
We also take the test interface shown in the above figure as an example to explain the usage of these two commands.
Drag the mouse to add the command of "check Settings elements" to the visual view. The "target" is the favorite "music" option and the "Sports" option. Note that the target to be searched is the check option of music and sports, not the music and sports text itself;
Drag the mouse to add the command of "get element tick" to the visual view, and the "target" is also the "music" option and the "Sports" option of your hobby;
Run the process, and the results are shown in the figure. The output contents are "like music" and "like sports", which indicates that the Settings element is checked successfully;
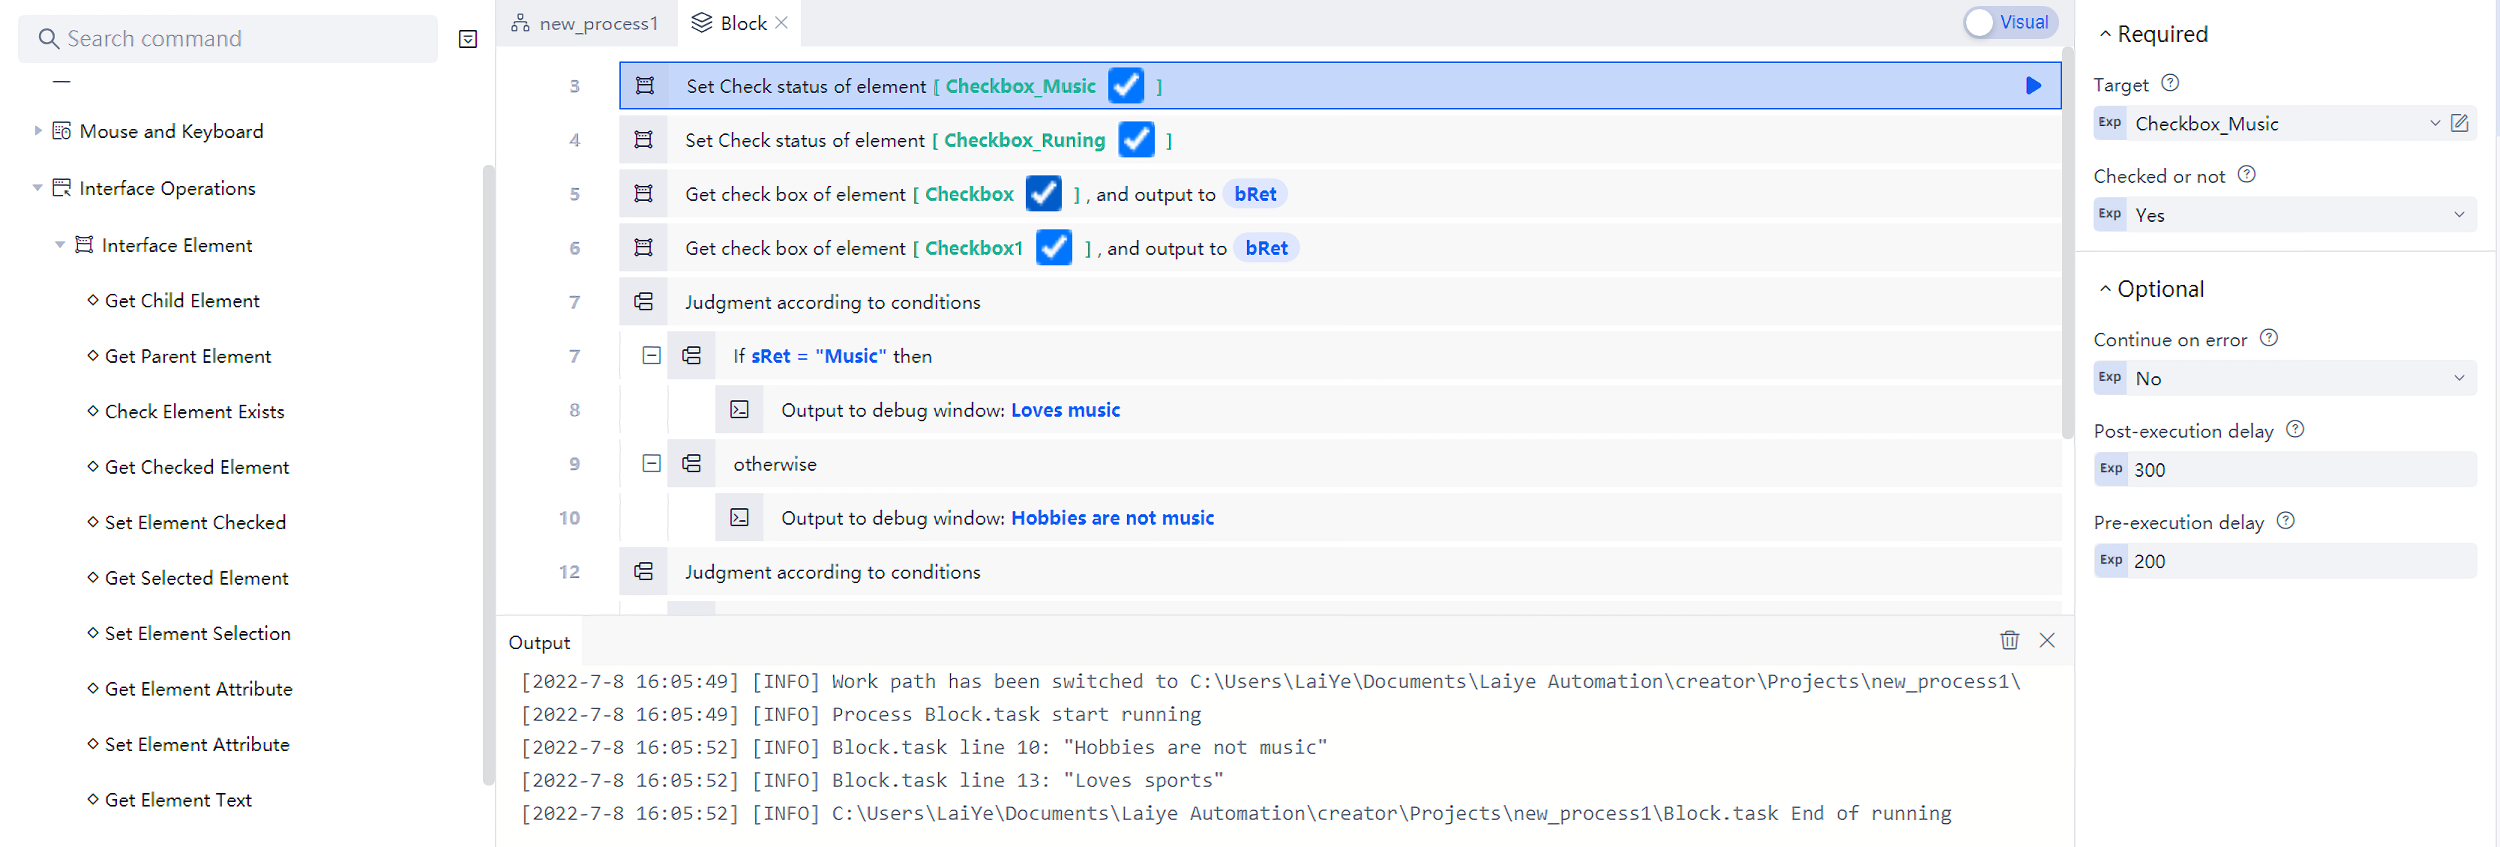
- On the test interface, we can also see that "music" and "Sports" were not checked in the past, but now these two options have been automatically checked. Therefore, through these two commands, you can automatically fill in the form.
Get child element
This section needs to use a little knowledge of "arrays" in the programming language. If you haven't mastered it, you can refer to the description of "array" in the following content, or skip this section for the time being.
As mentioned above, the elements on the interface usually have nested combinations. A large UI elements may also contain multiple small UI elements, which we call "sub elements". Similarly, among the child elements, there may also be multiple child elements, which may be called "Sun elements".
We went back to what we used to do experiments" Employee information table ". It can be imagined that on this UI, the whole table is a UI elements, where each row is a sub element, and each cell in each row is a sub element. The actual situation will be slightly more complicated than we thought, because there will be more hierarchical relationships in this table. For example, each row may already be a grandchild of the whole table, and each cell is a grandchild of the grandchild element.
You can actually test it. Drag the mouse to add the "get sub element" command to the visual view, and carefully move the mouse to set the target element as the whole table, as shown in the following figure:

At this time, on the right side of this command, there is a blue triangle (see the red box in the following figure). Click this triangle to run only the current row. Here is a little trick: when running a command line, if the command line has the "output to" attribute, Laiye Automation Platform will automatically display the output content in the "output" window below for debugging.
Among the attribute of this command, there is a very important attribute called "sub element level" (see the yellow box in the figure below). This attribute is usually an integer. When this attribute is 1, it means "get all child elements"; When this attribute is 2, it means "get all the grandchildren"; When this attribute is 3, it means "get all great grandchildren elements"; and so on. Of course, this attribute can also be 0, which means "get all child elements, grandchildren, great grandchildren, etc. until there is no next level element".
We can try. When the "sub element level" attribute is 2, we can get all the rows in the table. When the "sub element level" attribute is 4, we can get all the cells in the table. The output value of this command is actually an array, and each element of the array represents a UI elements. Each element in the array can also be directly used in other "UI elements operation" commands. For example, if we want to double-click each cell in this table, we can use the following process (please pay attention to the "target" attribute on the right):

The operation of UI elements also includes Settings / obtaining element selection, Settings / obtaining element attribute, Settings / obtaining element text, obtaining element area, element screenshot, etc. Please refer to the command manual of Laiye Automation Platform for the use method, and we will not repeat it here.
UI Analyzer
As mentioned above, the elements on the interface usually have nested combinations. A UI elements may also contain multiple "child elements", and "child elements" include "grandchildren".
For a relatively simple UI, it is generally enough to directly select the UI elements. However, some UI are particularly complex. For example, the following figure shows the commodity UI of an e-commerce website, which contains many UI elements, including pictures, icons, all kinds of text, and even text floating on the picture! The characteristics of these UI elements are different, and the nesting relationship is also complex. If you don't pay attention to them, it's easy to make mistakes.

In order to avoid "wrong selection" and "missing selection", an effective way is to carefully analyze the nesting relationship of UI elements to see which child elements, which "brother elements" and whose "parent elements" the UI elements we need to target. For example, the following are two common techniques:
- "Wrong selection" usually occurs between "brother elements". It was originally intended to find a certain UI elements, but its "brother" was found. If we carefully observe the characteristics of UI elements and their "brothers", we can easily find the characteristics that distinguish them and avoid "wrong selection".
- The reason for "missing selection" is that a certain attribute in the characteristics of UI elements often changes. Sometimes, although the attribute of the UI elements we are looking for will often change, the attribute of its parent element or child element is not easy to change. We can first find the relatively stable parent element or child element as the target, and then use the command of "get child element" or "get parent element" to find the UI elements we really need (of course, "get child element" will get an array, in which there may be more than one element, and we need to consider further differentiation). To avoid "missing selection".
With "UI Analyzer", you can easily query UI elements and their characteristics, and easily locate parent, child or sibling elements. The UI Analyzer is an independent Applications. In Laiye Automation Platform creator, several entries can be used to start the UI Analyzer. These inlets include:
- On the homepage of "Laiye Automation Creator", click the "tools" property to find the "start" button of UI Analyzer.
- When writing any process, you can find the button of "UI Analyzer" on the toolbar.
- When editing the attribute of any UI elements, you can find the "open from UI Analyzer" button.
When the UI Analyzer is opened in the first two methods, no UI elements is temporarily selected in the UI Analyzer. When the third method is used, the UI elements being edited will be automatically selected. In addition to the above differences, the UI Analyzer opened in the above ways is the same. The UI of the UI Analyzer is roughly as shown in the following figure:
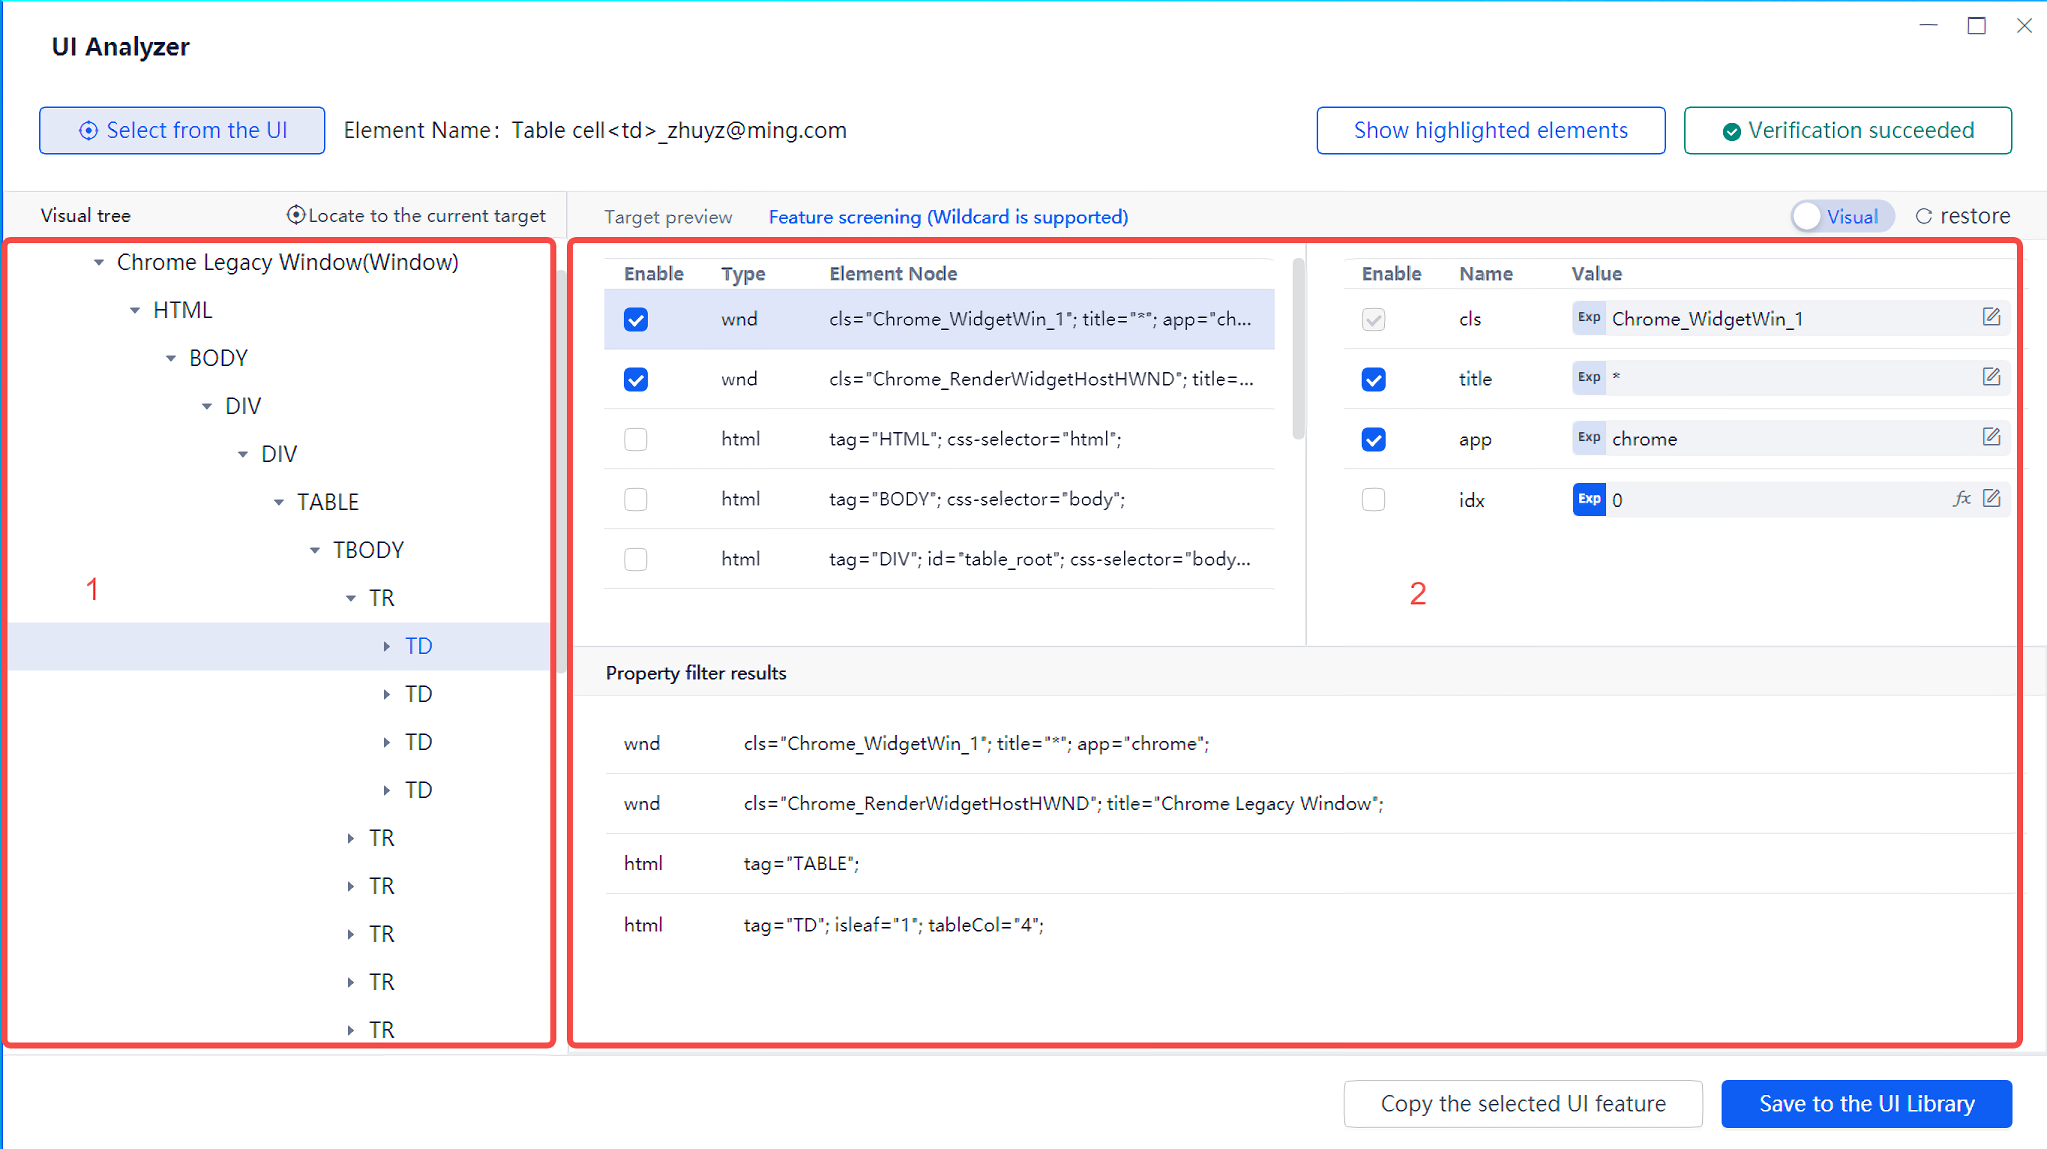
It seems a little complicated, but in fact, if you have read the previous content about editing UI elements, you should be familiar with area 2 in the above figure. A little different is that in area 2 of the above figure All The attribute of the UI elements that may be used are listed and displayed more than when editing the UI elements, so that you can carefully select the appropriate attribute combination to avoid "wrong selection" and "missing selection".
In the UI analyzer, area 1 in the above figure is more important. This area is a tree structure, called "visual tree". Each node in the tree represents a UI elements, and the parent-child relationship of each node in the tree represents their parent-child relationship in the UI. You can expand the following child nodes by clicking the small triangle on the left of the node.
When we use the UI Analyzer, we can usually perform the following operations:
- In the visual tree, view the parent-child and brother relationships between nodes.
- Right click a node in the visualization tree and select "Settings as target element" to display the attribute of this UI elements in area 2.
- After modifying the attribute of the UI elements, use the "check target" function to verify whether the UI elements can still be found after your modification.
- The position of UI elements is displayed through the function of "highlight element".
- If a process is currently open, you can use the save to UI Library function to save the UI elements in area 2 to the UI Library of the process.
For a complex UI, it is usually necessary to combine the above operations, analyze carefully and think carefully. We also need to practice regularly and accumulate experience so that we can be skillful in actual combat. As a reflection question, please consider again: if you want to find" Employee information table " Middle" Roosevelt " And double-click it. With the help of UI Analyzer, use as many ways as possible to achieve!
Install Extension
When selecting a target with a mask, a common situation is that the mask can only cover the entire window or the client area of the window, but cannot select the specific UI elements inside. As shown in the figure below, you can only select the entire page of the Chrome browser, not the input boxes and buttons.
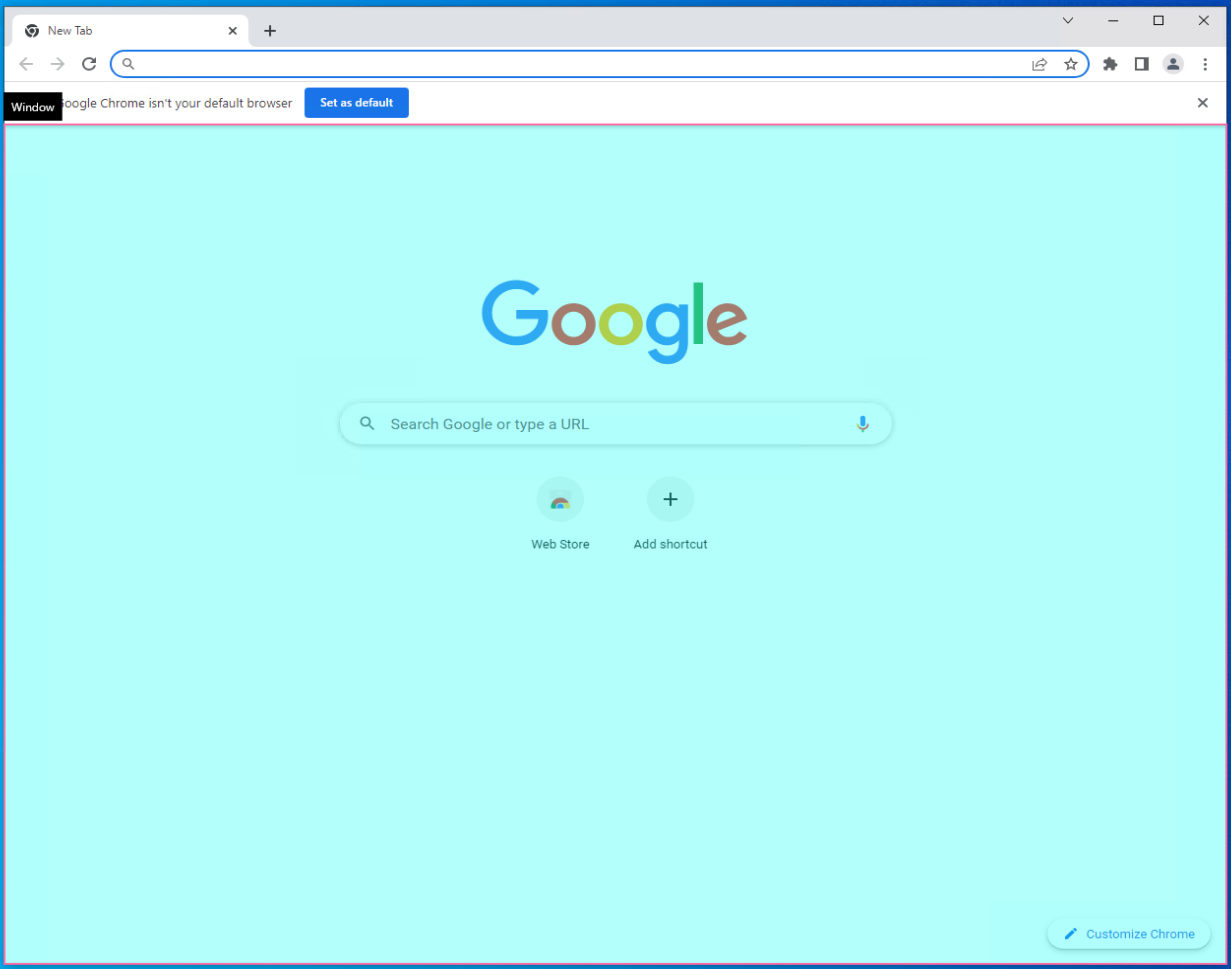
For this situation, there are two possibilities, one is that the UI can't be selected (we will discuss this situation in detail in the next chapter), the other is that the UI can be selected, but some additional work needs to be done. For example, after installing the Extensions for the software to be operated, the previously unselectable UI elements can be selected. At present, these Extension programs include Chrome browser Extension, Firefox browser Extension and Java program Extension. After installing these Extension, you can select page elements in Chrome browser, page elements in Firefox browser and UI elements of various Java Applications such as swing, AWT, JNPL, applet, etc.
Let's take Chrome browser as an example to see how to install these Extensions.
Chrome browser
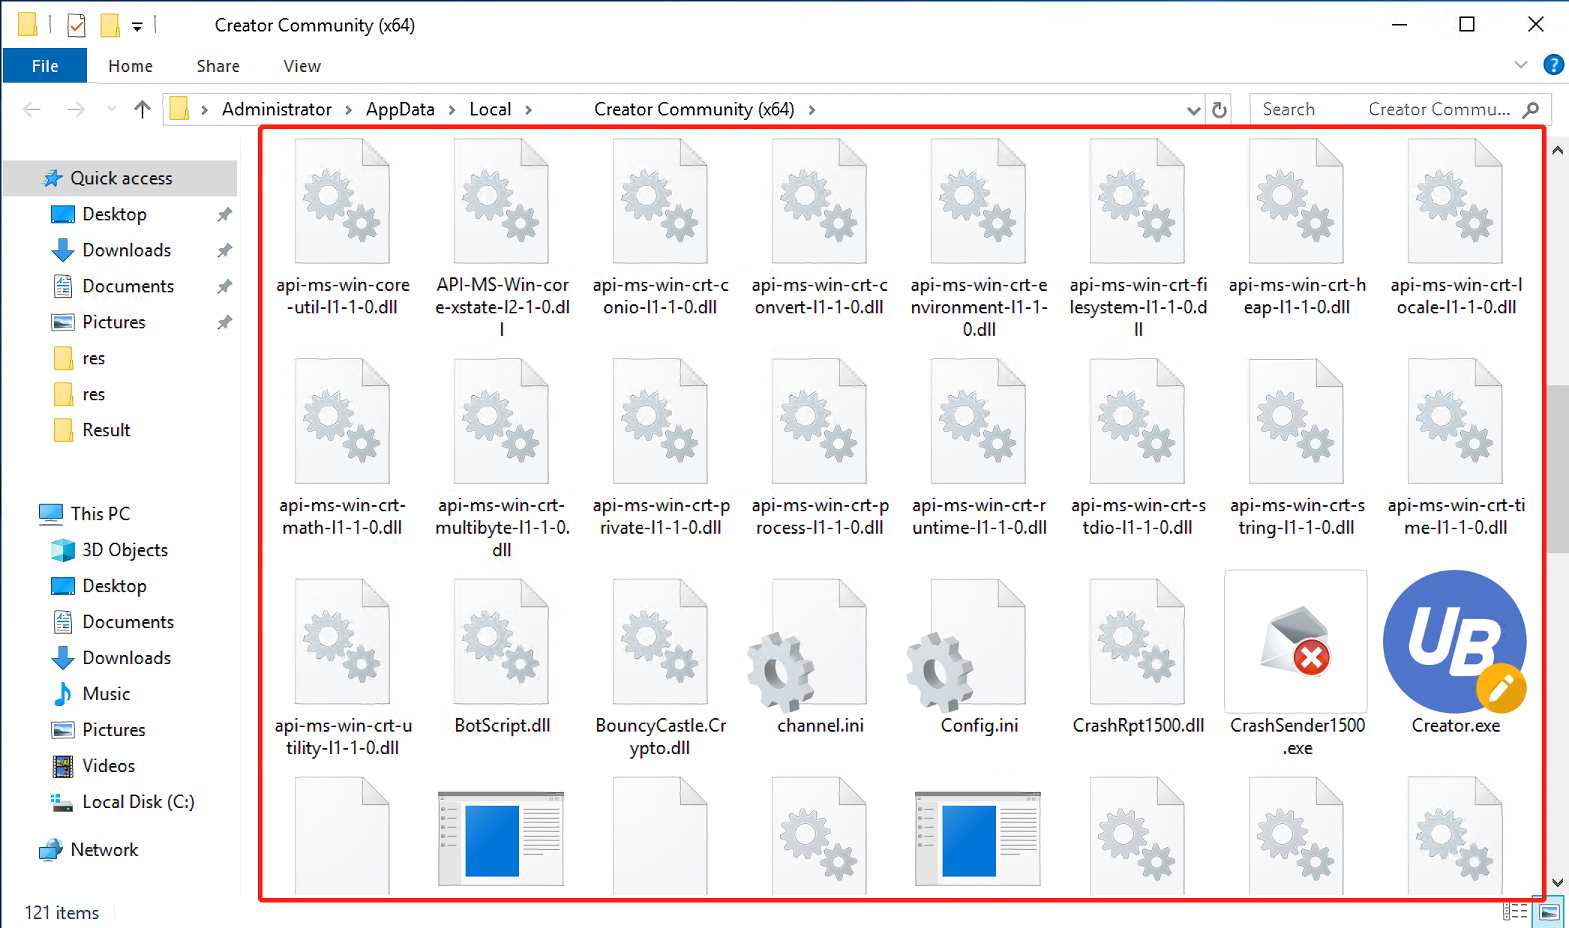
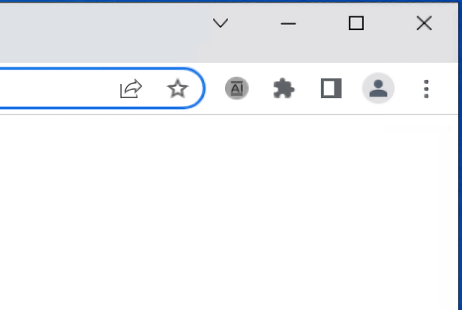
Chrome browser needs to be installed Extensions , And the Extensions is enabled. Please pay attention to the row of small icons on the right side of your Chrome browser's address bar. You should have this icon (the color may be gray, but it will not affect normal work) as shown in the following figure. When you move the mouse, there will be a text prompt "Laiye Automation Platform native message plugin".
If the Extensions is not installed, you need to follow the following steps to install it:
- Close the Chrome browser;
- Open Laiye Automation Platform creator and select any process. Select "help" - > "install Extension" and "chrome Extension" in the menu;
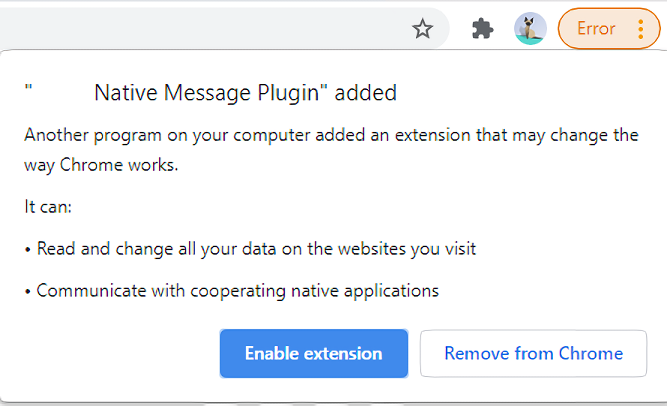
- Open the Chrome browser, wait a moment, and the browser will prompt that a new Extension has been added, as shown in the following figure. Please select "enable Extensions" at this time;
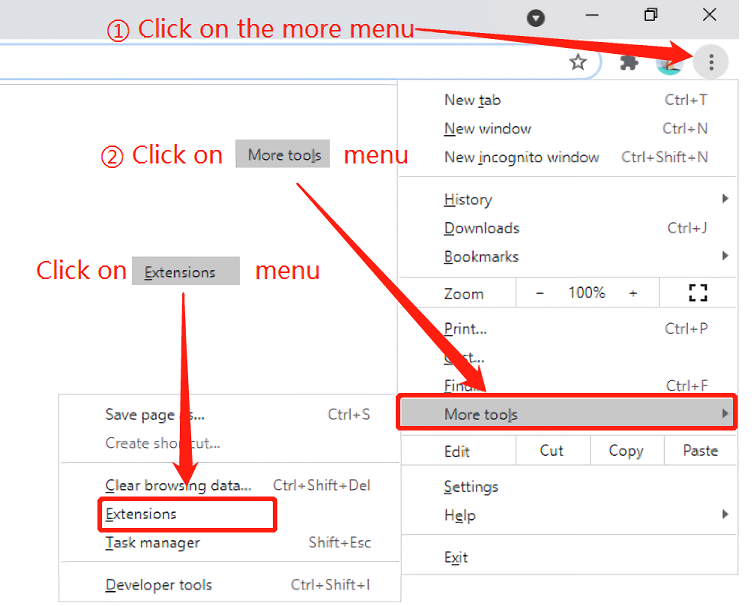
- If you still have problems, please open the Extension program management function of chrome and enable Laiye Automation Platform native message plugin as shown in the figure below.
In addition to IE and chrome browsers, we often use Baidu browser, 360 security browser, QQ browser and other domestic browsers. These browsers all use the chrome kernel or IE kernel. In theory, Laiye Automation Platform can also support obtaining the UI elements therein. However, due to different Settings methods and frequent changes, it is recommended to use native Chrome browser or IE browser in RPA process for simplicity.
SAP program
Laiye Automation Platform supports Record and automatic operation of SAP products. In order to recognize and operate SAP controls, you need to make some Settings for sap before starting.
Open SAP GUI scripting (server)
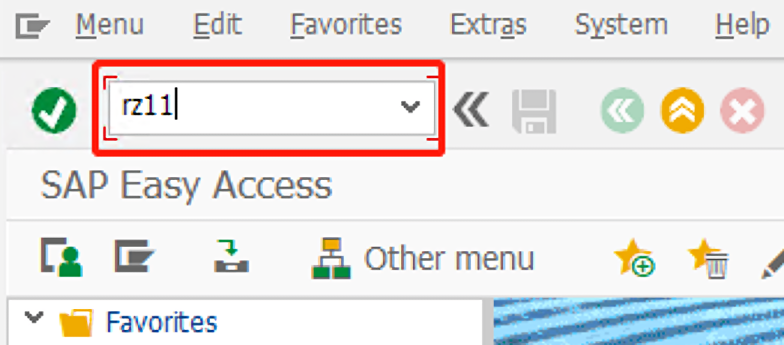
1. Log in to sap and execute transaction rz11
2. Enter the Parameter sapgui / user_ Scripting, and click "show"
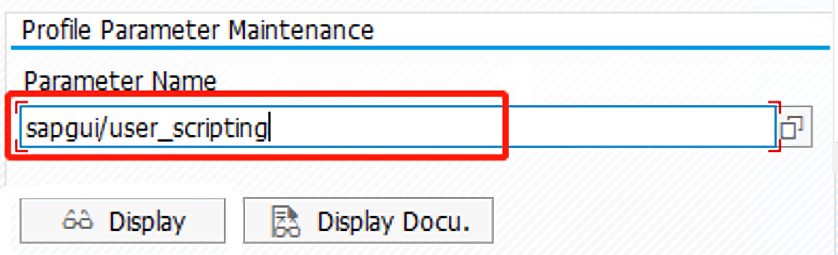
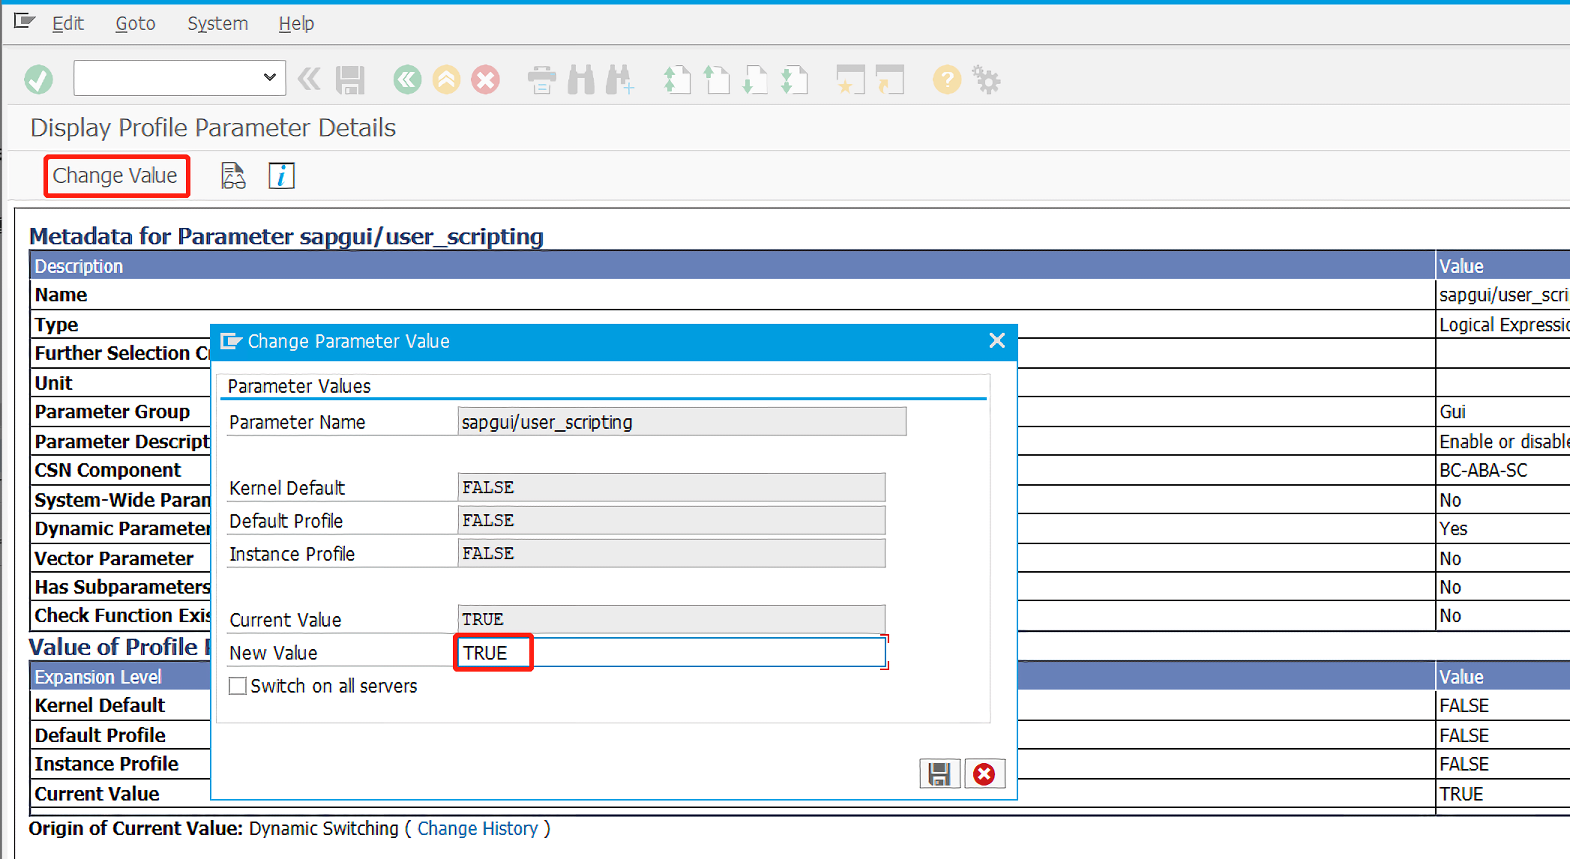
3. Click "change value" and enter true in "new value"
Open SAP GUI scripting (client)
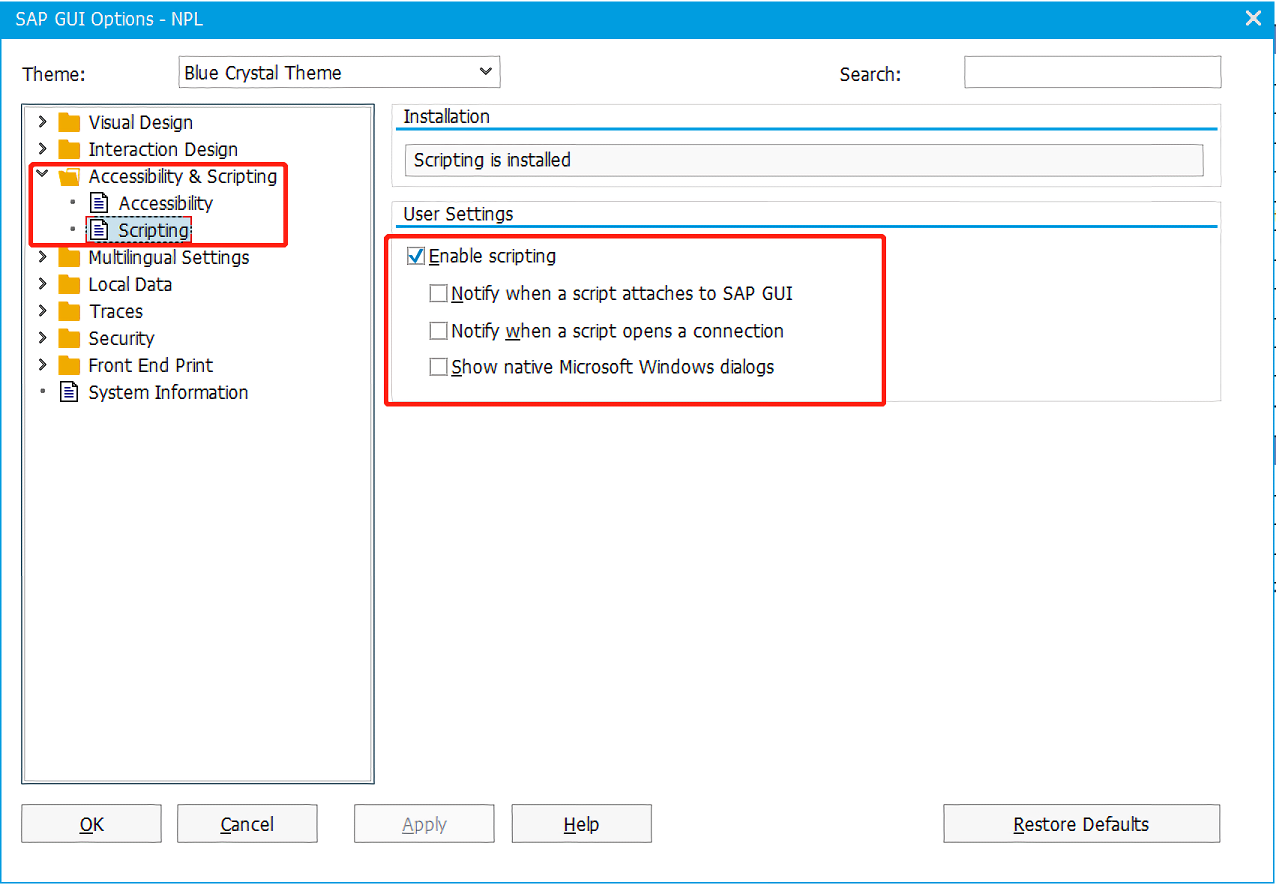
1. Log in to sap, click "customize local layout (ALT + F12)" and select "options"

2. Switch to "auxiliary functions and scripts" - "scripts" option, select "start script" in "user Settings" and block other notifications
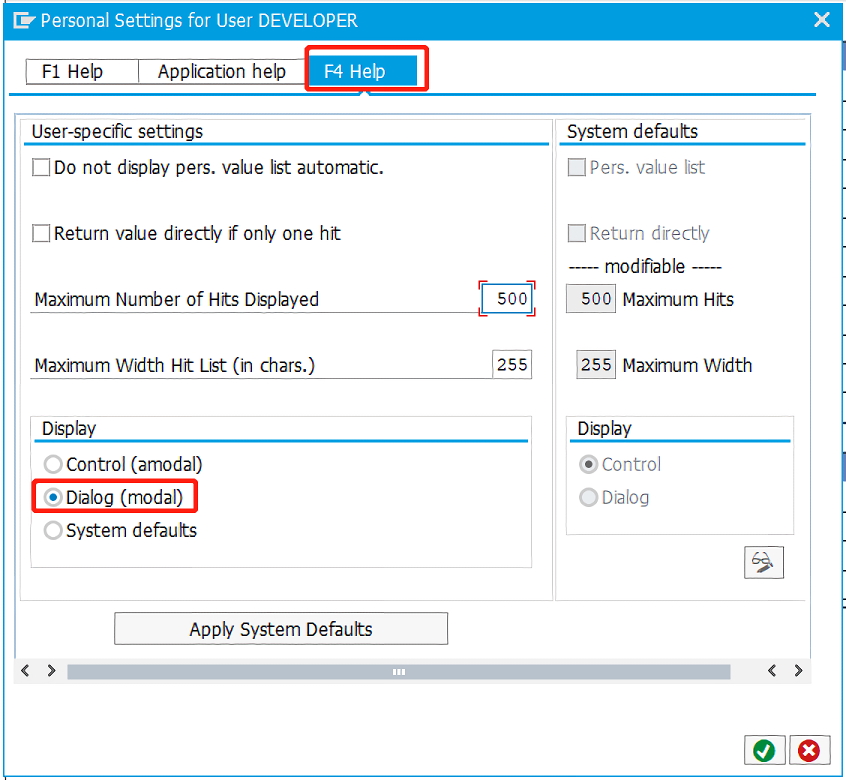
F4 help Settings as modal dialog box
1. Log in to sap and click "help" - "Settings..." menu
2. Switch to "F4 help" and select "conversation (mode)" in "display" setting