Trigger
Overview of trigger
The trigger management function is used to create and manage the running plan of task. The system will automatically dispatch task according to the rules set by the trigger, without manual intervention.

Trigger are divided into two types, which are applicable to different scenarios:
Time trigger : Automatically trigger task based on time rules, which is applicable to automated business scenarios that are executed regularly or repeatedly. For example, robot regularly checks assets every day and conducts financial reconciliation at the end of each month. Time trigger allows users to set a flexible time rule, and the system will create task according to the time rule.
Queues trigger : Monitor the specified queues. When the number of queues messages meets the requirements, task are automatically triggered to consume queues data. It is applicable to scenarios where a large amount of business data needs to be processed in batch, and it can ensure that the business data in the queues is processed by the robot in a timely manner. For example, the financial robot of each sub center submits the reimbursement application data to queues , The financial robot of the headquarters arrived queues Extract reimbursement application data and then process it uniformly for reimbursement.
Note:
- Time trigger It is a new concept added in version 6.5 to replace the original "trigger". When the system is upgraded from version 6.5 to version 6.5 and later, the existing trigger will be automatically classified as "time trigger".
- Queues trigger It is a new feature added in version 6.5.
New trigger
Depending on the type of trigger, the operation of creating a new trigger is different. The following types will be explained in detail.
New Time trigger
The process of creating a time trigger is divided into three steps:
Step 1: Set basic information
This step requires setting the basic information of the trigger.
Setting item description:
- Trigger Name : The name must be globally unique and cannot be the same as other trigger.
- Select process : Select a process in the process list, and the trigger will run based on the enabled version of the process.
- Select Department : The department to which the task belongs.
- Select Worker : The Worker to be executed by the specified task can select the unattended worker or the designated robot in the Worker group.
- Number of task created : The number of task created per trigger. For example, setting to 2 will create 2 task.
- priority : Task priority: high priority task will be executed by robot first.
- Maximum Run Time : The longest running time of a task. When the set value is exceeded, the system will issue a stop command.
- Validity period : The validity period of the task, in days. When the task expires and is not running, it will automatically become invalid and cannot be executed.
- screen recording : Whether to Record the screen of Worker.
- Instructions : Additional description of the trigger.
The task validity period is the new function of 6.5 version.
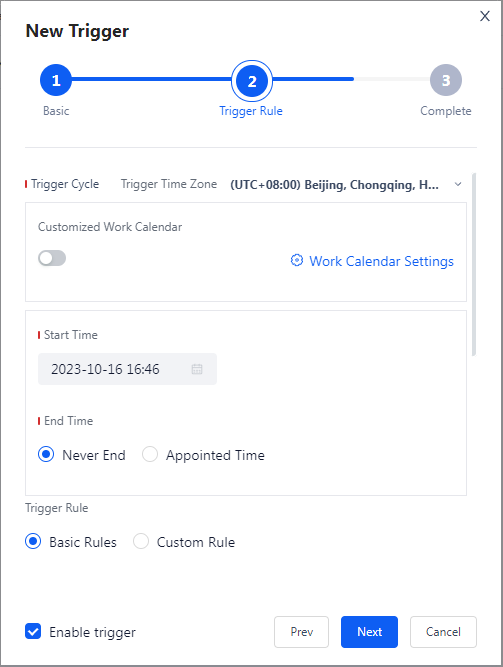
Step 2: Set trigger Rules
In this step, you need to configure the detailed rules of the time trigger.
Setting item description:
- Trigger cycle : Set the time zone of the trigger, and enable the work calendar to trigger task based on working days.
- Startup time : The time when the trigger starts to trigger the task.
- End time : Trigger End The time when the task is triggered. You can select Never End or specify the end time.
- Trigger Rules : Support basic rules or custom rules. Custom rules are set using CRON expressions.
Basic rules
Basic rules support setting running frequency and rules:
- operating frequency : The minimum granularity of operating frequency is supported up to 'minutes'.
- operating rules : It can be set to be executed at a specified time point or repeated after a certain interval of time.
Custom Rules
Custom rules can be freely set through CRON expressions.
The CRON expression structure is "time-sharing day month week", for example, "5 * 1 * *" means "triggered at the 5th minute of the 1st day of each month week".
The fields and symbols supported by CRON expressions are as follows:
| field | Mandatory or not | allowed value | Permitted special characters |
|---|---|---|---|
| Second (second) | yes | 0~59 | , - * / |
| Minute (minute) | yes | 0~59 | , - * / |
| Hour (hour) | yes | 0~23 | , - * / |
| Date (day of month) | yes | 1~31 | , - * ? / L W |
| Month (month) | yes | 1~12 | , - * / |
| Day of week | No | 0~6 | , - * ? / L # |
| symbol | Instructions |
|---|---|
| , | List multiple values, such as 6,17,33 indicating the 6th, 17th, and 33rd minute triggers. |
| - | Specify the range, for example, 2-9 indicates triggering from 2 to 9 o'clock. |
| * | Match all values, such as using * in the Minutes field to indicate trigger per minute. |
| ? | Similar to *, replace with non mandatory. |
| / | Starting from the starting value, trigger every fixed time, for example, 5/20 means trigger every 20 minutes starting from the 5th minute. |
| W | Triggered on the nearest working day of the specified date, for example, 15W means triggered on the nearest working day to the 15th of each month. |
| # | What is the day of the third Friday of each month, such as 5 # 3. |
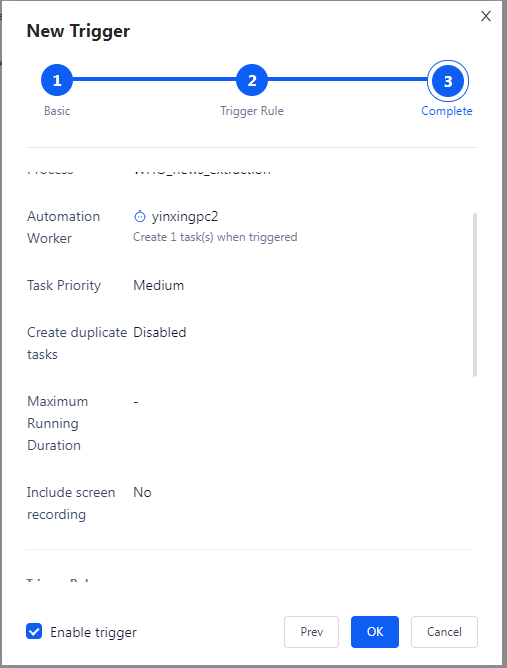
Step 3: trigger confirmation
In this step, you can view the basic information, rules and expected execution information of the trigger. After confirming that there are no errors, click "OK" to complete the save.
New queues trigger
The process of creating a queues trigger is divided into three steps:
Step 1: Set trigger information
In this step, you need to set the basic information of the queues trigger.

Setting item description:
The various settings are as follows:
Trigger Name : Globally unique, cannot have the same name as any other trigger
Trigger queues : For the queues monitored by the trigger, you need to select an existing queues. Note that you can only see queues within your permission range. If you cannot see the desired queues, you can contact the person in charge of the queues to add you as a collaborator
Trigger minimum number of valid messages : In queues
未消费-已生效When the number of messages reaches this number, the task will be triggered. The input range is 1 to 1000, with a default value of 1
Setting suggestions: If you expect to execute task and consume task in a centralized manner after queues messages have a certain backlog, you can set this value as needed to avoid robot processing queues messages too quickly.
- Check at regular intervals, even if the number of valid messages is insufficient, it will still trigger : When you set Trigger minimum number of valid messages This option only appears when it is greater than 1. This option is mainly used to avoid that task cannot be triggered to process these data when there are few valid messages remaining in the queues. Suggest setting the processing time that business data can wait for based on the business situation
Setting suggestions: This option is usually used to process the last few messages left in the queues, such as when setting Trigger minimum number of valid messages When it is 10, when the messages in the queues are consumed by the task to less than 10, the task will no longer be triggered. If subsequent queues messages still do not grow, these messages may not be processed in time. At this point, you can check this option to ensure that the remaining messages can also be triggered.
- Check interval time : If you have checked it Check at regular intervals, even if the number of valid messages is insufficient, it will still trigger Option, this option will appear. You need to set how often the system will force the task to trigger to process the remaining messages in the queues that are less than the number of valid messages. You can select a value from the fixed time interval provided by the system. The options provided by the system are
10分钟The20分钟,60分钟,90分钟,120分钟
Suggestion for setting: You can set the waiting time according to the tolerance of the business. For example, if the business wants the message to be processed within 2 hours, you can consider setting this value to 60 minutes.
- On average, every few messages trigger once : The system will determine the number of triggers per minute based on the current total number of messages and this value. It is recommended to set it to the number of messages that a process can process. For example, if a process can process 10 messages, it can be set to 10. Note: In the task triggered by a queues trigger
待运行and运行中Total number of task for No more than the number of Worker specified . For example, when a single Worker is specified, there will be no more than 1. If a Worker group is specified, there will be no more than the total number of robot in the Worker group. trigger per minute Check whether the task is triggered. If the conditions for triggering the task are met, the task will be triggered N times immediately. The calculation method of N is as follows:
info
Assume:
A=in the current queues 未消费-已生效 number of messages
B = On average, every few messages trigger once The set value
C=in the task triggered by the current queues trigger 待运行 and 运行中 Total number of task for
So the calculation method is: N=RoundUp (a/b) - c, where RoundUp means rounding up.
Example: Assuming the set On average, every few messages trigger once 10, there are 6 robot in the designated robot group, and the current queues trigger has
Three of the generated task are still in 待运行 / 运行中 Status. There are 78 valid messages in the current queues, which theoretically will be triggered at this time
RoundUp (78/10) -3=5 times. But the system also needs to ensure that it is simultaneously in 待运行 and 运行中 Total number of task for No more than the number of Worker specified , So the number of times that will be triggered finally is 3 (the total number of robot is 6- task to be run/running 3=3).
Customize Work Calendar : Choose whether to enable custom work calendar. When enabling, you need to select a custom calendar and make detailed calendar settings. Please refer to the custom calendar operation instructions section below for details
Instructions : Description of trigger
warning
Note: queues trigger per minute Carry out a trigger check. Since it takes a certain time for robot to execute task, robot may not be able to consume queues data immediately, so it may occur that the number of messages in queues is only enough to trigger X task, but the number of task triggered actually exceeds X, so some task are exceeded The queues data may not be actually retrieved . In this case, it is recommended that you consider the following when designing the process:
- Get queues messages as early as possible in the process
- In the process, fault tolerance processing is performed when queues messages are retrieved. For example, if queues messages are not retrieved, the business will be suspended this time.
Step 2: Set task information
This step needs to configure the task information of the queues trigger.
Setting item description:
- Select process : Select the process in the process list.
- Select Department : The department to which the task belongs.
- Select Worker : Specify the Worker for task execution.
- Number of task created : The number of task created each time they are triggered. It is fixed as 1 in the queues trigger.
- Task priority : Task priority: high priority task will be executed by robot first.
- Maximum Run Time : The maximum time that a task runs.
- Validity period : The validity period of the task.
- screen recording : Whether to Record the screen of Worker.
Step 3: trigger confirmation
In this step, you can view the basic information, rules and expected execution information of the trigger. After confirming that there are no errors, click "OK" to complete the save.
Customize Work Calendar
New Work Calendar
Click the "New Calendar" button to set the name, template and time range to save.
The template provides the following three types:
- Weekend and weekends calendar : Saturday and Sunday are non working days.
- Sunday single day off calendar : Sunday is a non working day.
- Blank calendar : All dates are working days.
After creation, you can set the date on the calendar as a non working day by clicking on it, or by uploading a calendar file.
Add collaborator
Click the trigger in the trigger list, and select "Add collaborator" to set the corresponding collaborator.
| role name | Instructions |
|---|---|
| owner | Can edit, set whether to open, delete trigger and Add collaborator |
| manager | Editable trigger, set whether to enable trigger, and Add collaborator |
| editor | Edit trigger, set whether to enable trigger, and view |
| User | The trigger can be viewed. |
Trigger Details
Trigger details include basic information, trigger rules, trigger records and attribution information. The specific display fields vary according to the type of trigger.
Time trigger Details
Basic Information Display Fields:
- Name
- Status (enabled or disabled)
- Process Name
- Department Name
- Worker
- Task priority
- New Recurring task
- Maximum Run Time
- Screen recording
- Instructions
Trigger rule display field:
- Customize Work Calendar
- Startup time
- End time
- Operating logic
- Next startup time
Queues trigger Details
Basic Information Display Fields:
- Name
- Status (normal or abnormal)
- Enable or not
- Trigger type
- Trigger queues
- Minimum number of valid messages
- Check interval time
- On average, every few messages trigger once
- Customize Work Calendar
- Instructions
Task information display fields:
- Process Name
- Department Name
- Worker
- Task priority
- Maximum Run Time
- Screen recording
Trigger record
Click the trigger in the trigger list to view the trigger record. The record includes the time, time zone and result of each trigger, as well as the corresponding task number, process name, Worker and task status.
Edit trigger
Click the "Edit" button to modify the trigger information. The editing function is the same as when creating a new one, but the trigger time zone cannot be modified.
note
When the process specified by the trigger changes the Version list referenced by the trigger (for example, process releases a new version or Version list switches, etc.), the change of each parameter in the referenced trigger will follow the following rules:
- If the parameter in the new version of the process remain unchanged, the corresponding parameter in the trigger will continue to maintain their original settings.
- If the parameter default value in the new version of the process changes, the corresponding parameter in the trigger will remain the original setting.
- If the parameter type in the new version of the process changes, the corresponding parameter in the trigger will Adjust to the default value of the new parameter .
- If the parameter in the new version of process is removed, the corresponding parameter in the trigger It will also be removed .
- If the parameter name in the new version of the process changes, the corresponding parameter name in the trigger will also change, and Take the default value of the new parameter .
For this reason, it is recommended to pay attention to the following matters when developing a new version of the process:
- If the meaning of the parameter has not changed, try not to modify the name or type of the parameter.
- If the modification of parameter may cause the change of trigger parameter, please inform relevant business personnel in advance so that they can adjust in time.
Delete trigger
Click the "Delete" button and confirm again to delete the corresponding trigger.
Permission Management
Click the "Permission Management" button of trigger to manage trigger permissions and support adding or deleting collaborators.
| role name | Instructions |
|---|---|
| manager | You can edit trigger, assign permissions, etc. |
| User | The trigger can be viewed. |